Sunday, April 29, 2012

Roasted Chicken, Pasta & Sun-dried Tomatoes

  •  1/2 pound fusilli (spirals) pasta
  • Kosher salt
  • Olive oil
  • 1 pound ripe tomatoes, medium-diced
  • 3/4 cup good black olives, such as kalamata, pitted and diced
  • 1 pound fresh mozzarella, medium-diced
  • 6 sun-dried tomatoes in oil, drained and chopped
I added roasted chicken from a rotisserie cooked grocery store  

Dressing:

  • 5 sun-dried tomatoes in oil, drained  ( I added more cause I love them)
  • 2 tablespoons red wine vinegar
  • 6 tablespoons good olive oil
  • 1 garlic clove, diced
  • 1 teaspoon capers, drained
  • 2 teaspoons kosher salt
  • 3/4 teaspoon freshly ground black pepper
  • 1 cup freshly grated Parmesan
  • 1 cup packed basil leaves, julienned

Cook the pasta in a large pot of boiling salted water with a splash of oil to keep it from sticking together. Boil for 12 minutes, or according to the directions on the package. Drain well and allow to cool. 

Place the pasta in a bowl and add the tomatoes, olives, mozzarella, and chopped sun-dried tomatoes.

Dressing
For the dressing, combine the sun-dried tomatoes, vinegar, olive oil, garlic, capers, salt, and pepper in a food processor until almost smooth.
Pour the dressing over the pasta, sprinkle with the Parmesan and basil, and toss well.

Saturday, April 28, 2012

Gabby's Best Guacamole

Another recipe from What's Gabby Cooking  - easy and good!

3 avocados
1 lemon, juiced
1/4 red onion, finely chopped
1/8 cup chives, finely chopped
2 tbsp of your favorite salsa
salt and pepper to taste


Mix all these ingredients together until you have a consistency that you like. Top with some extra chives just so its looks super beautiful and get yourself a bag of chips to eat it with… or in my case just a spoon because its so good it doesn’t even need chips!

Friday, April 27, 2012

Jumbo Coffee Cake Muffins

Jumbo Coffee Cake MuffinsThese tender cinnamon-sugar behemoths are a specialty at the Inn at Pinewood, 5 miles east of Eagle River, Wisconsin. The recipe was so popular with readers that it made Midwest Living's list of "Our 20 Best Recipes of All Time."

  Makes: 6 servings Yield: 6 muffins Oven: 25 mins at 350°F
 
  • Nonstick cooking spray
  • 1 1/2 cups all-purpose flour
  • 2 teaspoons baking powder
  • 1/4 teaspoon baking soda
  • 1/4 teaspoon salt
  • 1/4 cup shortening
  • 1 8 ounce carton dairy sour cream or plain yogurt
  • 1/2 cup granulated sugar
  • 1/2 cup milk
  • 1 beaten egg
  • 1/4 cup packed brown sugar
  • 1/4 cup chopped nuts
  • 2 tablespoons granulated sugar
  • 1 teaspoon ground cinnamon

Directions

1. Lightly coat 6 jumbo (3-1/2-inch) muffin cups with cooking spray or line with paper bake cups. Set aside.
2. In a mixing bowl, combine the flour, baking powder, baking soda, and salt. Cut in the shortening until the mixture is crumbly.
3. In another bowl, stir together the sour cream or yogurt, the 1/2 cup sugar, the milk, and egg. Add to the dry ingredients and stir until just combined.
4. Stir together the brown sugar, nuts, the 2 tablespoons sugar, and cinnamon.
5. Spoon half the batter into prepared muffin cups. Sprinkle half of the nut mixture into cups. Top with remaining batter and the remaining nut mixture.
6. Bake in a 350 degree F oven for about 25 minutes or until a toothpick inserted in center comes out clean. Cool 15 minutes in pan on wire rack. Remove from pan and serve warm.
  • For standard-size muffins, use twelve regular (2-1/2-inch) muffin cups; divide batter evenly as above. Bake in 400 degree F oven for 15 to 18 minutes. Cool 5 minutes. Remove from pans and serve warm.


Tomato and Mozzarella Tart

Photo by Gabby Dalkin 

This is another fabulous recipe from the website, "What's Gabby Cooking"... 
 
A few reminders from Gabby: There are a few things to keep in mind when using puff pastry

When your puff pastry is in the oven – don’t keep opening and closing the door. The crust won’t puff as much as it can!


Load on your ingredients – in this case tomatoes, mozzarella, salt and pepper and bake it in the oven according to the instructions on the box or until the pastry starts to turn a golden brown. When its time to come out of the oven, sprinkle basil over the top and serve!

Thursday, April 26, 2012

Whipped Garlic Sauce

This recipe comes from What's Gabby Cooking - and she raves about her addition to it. I've not yet tried this recipe but whenever I see someone rave on and on and it has garlic in it, I know I'll like it and probably love it. Typically, this dip is served in Mediterranean and Lebanese restaurants
 
So here it is...her photo and recipe. she calls it a dip, sauce or spread  and says, "… who knows. All I know is that I’m totally obsessed."


So here it is. The recipe that’s about to change your life.

"Garlic Dip/sauce/spread. It’s also know as Toum. Make a batch. Keep it in the fridge and then serve it on chicken, pita, steak, bread, pasta, basically anything that goes well with garlic."

  • 2 cups grapeseed oil
  • 1/4 cup fresh lemon juice (I used meyer lemons)
  • 1/2 cup freshly peeled garlic
  • 1 tsp salt
  1. place the peeled garlic and salt into a food processor. pulse for 1 minutes until the garlic is broken down into small pieces.
  2. Turn the food processor on and SLOWLY steam in 1/2 cup of the grapeseed oil followed by 1 tbsp of the lemon juice. Let the mixture combine for about 1-2 minutes and then repeat this process 3 more times until all your ingredients have been used up. Be sure to add the oil slowly each time.
  3. Adjust salt if needed and serve with chicken, pita, or whatever else you would like!

Tuesday, April 24, 2012

Grilled Beer Braised Brats from Midwest Living

Beer-Braised Brats This recipe was in Midwest Living - from Wisconsin

Makes: 10 servings Prep: 30 mins Grill: 20 mins to 30 mins Cook: 10 mins
 
  • 10 uncooked bratwurst links (2 1/2 pounds total)
  • 1/4 cup butter
  • 1 large onion, halved and cut into thin slices
  • 2 12 ounce bottle or cans dark German beer
  • 2 tablespoons packed brown sugar
  • 2 tablespoons vinegar
  • 1 teaspoon caraway seeds
  • 1 teaspoon dried thyme, crushed
  • 1 teaspoon Worcestershire sauce
  • 10 hoagie buns, bratwurst buns, or other crusty rolls, split and toasted
  • Easy Cranberry-Pickle Relish

Directions

1. Pierce bratwurst with fork. For a charcoal grill: Arrange medium-hot coals around a drip pan. Test for medium heat above pan. Place bratwurst on grill rack over drip pan. Cover; grill 20 to 30 minutes or until instant-read thermometer inserted into bratwurst registers 160 degree F, turning once halfway through grilling time. (For a gas grill: Preheat the grill. Reduce heat to medium. Adjust for indirect cooking. Grill as directed above.)
2. Meanwhile, in a Dutch oven, heat butter over medium heat. Add onion; cook and stir about 5 minutes or until tender. Add beer, brown sugar, vinegar, caraway seeds, thyme, and Worcestershire sauce. Bring to boiling; reduce heat. Place bratwurst in beer mixture; keep warm until serving time.
3. To serve, place grilled bratwurst in a bun or roll. Using a slotted spoon, top with some cooked onion slices and Easy Cranberry-Pickle Relish. Makes 10 sandwiches.
  • Can tote cooked brats and the beer cooking liquid to your tailgating site in an insulated container. Serve within 1 to 2 hours.
Easy Cranberry-Pickle Relish
 1 cup canned whole cranberry sauce 
1/2 cup sweet pickle relish

In a small bowl, combine cranberry sauce and sweet pickle relish.

Monday, April 23, 2012

Vanilla Powder Wacky Cake

Another recipe from one of my favorite food blogs, Fat and Happy Food Blog - she has a lot of unusual recipes... grab a cup of coffee and surf her blog!

I remember making these in home ec in the 60's - and made them for my family... Wacky cakes became popular during the depression because ingredients were hard to get so they contain no butter or eggs. To make them even quicker, they are stirred in the same baking pan you will cook them in! So... less to clean up.
  
Instead of using cocoa as the base, she used vanilla powder. To keep the calories down, she opted for applesauce in place of the oil, for that reason, the texture of this cake is reminiscent of a quick bread. When you get a good forkful of the cake, a blueberry and the crumb topping, it makes for one good fat and happy bite.


Tips and Techniques: Switch up the flavor of this cake with ease by changing the fruit filling. Try Strawberries, peaches or apples! If you don't have vanilla powder, either add an extra tablespoon of the Grand Marnier or add a teaspoon of liquid vanilla extract.
  Burwell General Store Recipe Swap: Blueberry Applesauce Wacky Cake with Crumb Topping


Blueberry Filling for Wacky Cake
1 cup frozen blueberries
2 Tbls sugar
squeeze of lemon
1 tsp corn starch

Make the blueberry filling first.  Combine all ingredients in a small sauce pan, cook over medium heat for about 10 minutes. Remove from heat and set aside until ready to use. This step can be done a day or two ahead of time.

Butter Crumb Topping
2 Tbls butter, room temperature
2 Tbls flour
2 Tbls powder sugar


Place all the ingredients on a plate, use a fork to mash the dry ingredients into the butter. Once it is all combined, set aside until ready to use.


Vanilla Powder Wacky Cake

1 1/2 cups flour
1 Tbls vanilla powder
1 cup sugar
3/4 tsp salt
1/2 tsp baking powder
1 tsp baking soda
1 cup water
1 tsp champagne vinegar
1 Tbls Grand Marnier
5 Tbls applesauce

Have the blueberry filling and the crumb topping ready. Once you add the vinegar to this cake, you need to work quickly.

Preheat oven to 350 degrees. Have the one cup of water ready. In a greased 8 1/2 x 8 1/2 baking dish, sift in all the dry ingredients and stir with a fork. Make 3 holes in the flour and place the Grand Marnier in one hole and the applesauce in the second. Quickly add the vinegar to the third and then pour in the water while stirring everything together with a fork.

Spoon the blueberry filling over the top of the cake, and then crumble the butter crumb topping on top of the filling.  Place in the oven until a toothpick comes out just about clean, the crumb topping will not brown so don't look to that as an identifier. My cake took around 40 minutes or so but keep an eye on it - it's better to under cook this than over cook.

Remove from the oven and cool slightly. If serving this warm, a scoop of ice cream or a dollop of whipping cream would be a fantastic addition.


Angel Chicken

Angel Chicken
 
Makes: 4 servings Prep: 15 mins Cook: 4 hrs to 5 hrs on low
 
  • 4 skinless, boneless chicken breast halves (about 1-1/2 pounds)
  • 1 tablespoon vegetable oil (optional)
  • 1 8 ounce package fresh button mushrooms, quartered
  • 1 8 ounce package fresh shiitake mushrooms, stems removed, caps sliced
  • 1/4 cup butter
  • 1 0.7 ounce package Italian dry salad dressing mix
  • 1 10 3/4 ounce can condensed golden mushroom soup
  • 1/2 cup dry white wine
  • 1/2 8 ounce tub cream cheese spread with chives and onion
  • Hot cooked rice or angel hair pasta
  • Snipped fresh chives or sliced green onions (optional)

Directions

1. If you like, brown chicken on both sides in a large skillet in hot oil over medium heat. Combine mushrooms in a 3-1/2- or 4-quart slow cooker; top with chicken. Melt butter in a medium saucepan; stir in Italian dressing mix. Stir in mushroom soup, white wine, and cream cheese until melted; pour over chicken.
2. Cover; cook on low-heat setting for 4 to 5 hours.
3. Serve chicken and sauce over cooked rice. Sprinkle with chives, if you like. Makes 4 servings.

Lemon-Rosemary Chicken with Roasted Vegetables

  Makes: 4 to 5 servings Prep: 30 mins Roast: 1 hr 15 mins at 375°F Stand: 10 mins
 
  • 1 pound small Yukon gold potatoes, peeled and quartered
  • 1 pound sweet potatoes, peeled and cut into chunks
  • 1 cup packaged peeled fresh baby carrots
  • 3/4 cup halved shallots and/or onion chunks
  • 1/4 cup butter or margarine, melted
  • 1/2 teaspoon kosher salt or 1/4 teaspoon regular salt
  • 1/2 teaspoon ground black pepper
  • 1 3 1/2 - 4 pound whole roasting chicken
  • 1 teaspoon finely shredded lemon peel (set aside)
  • 1 lemon, halved
  • 1 tablespoon snipped fresh parsley
  • 1 tablespoon snipped fresh rosemary or 1 teaspoon dried rosemary, crushed
  • 1 tablespoon snipped fresh thyme or 1 teaspoon dried thyme, crushed
  • 2 cloves garlic, minced garlic, minced
  • Fresh thyme sprigs (optional)
  • Garlic bulbs, tops sliced off (optional)
  • Lemon halves (optional)

Directions

1. In a large bowl combine Yukon gold potatoes, sweet potatoes, carrots and shallots and/or onion. Drizzle vegetables with half of the melted butter. Sprinkle with half of the salt and half of the pepper; toss gently to coat.
2. Rinse the chicken body cavity; pat dry with paper towels. Skewer neck skin of chicken to back. Place the one halved lemon in body cavity. Tie legs to tail. Twist wing tips under back. Place chicken, breast side up, on a rack in a shallow roasting pan. Brush chicken with the remaining melted butter.
3. In a small bowl, stir together lemon peel, parsley, rosemary, snipped fresh or dried thyme, minced garlic, the remaining salt and the remaining pepper; rub onto chicken. If you like, insert a meat thermometer into center of an inside thigh muscle. (The thermometer should not touch bone.) Place vegetables around chicken. If you like, add fresh thyme sprigs, garlic bulbs, and additional lemon halves.
4. Roast, uncovered, in a 375 degree F oven for 1-1/4 to 1-1/2 hours or until drumsticks move easily in their sockets and chicken is no longer pink (180 degrees), stirring vegetables once or twice. Remove chicken and vegetables from oven. Cover; let stand for 10 minutes before carving chicken.* Makes 4 to 5 servings.
If the vegetables are not done, return them to the oven while the chicken stands

Easy Balsamic Chicken - Low Carb

From Midwest Living 

Makes: 4 servings Prep: 10 mins Marinate: 1 hr to 4 hrs Grill: 10 mins to 12 mins
  • 4 skinless, boneless chicken breast halves (about 1 pound total)
  • 1/4 cup balsamic vinegar
  • 1/4 cup olive oil
  • 3 cloves garlic, minced
  • 1/4 teaspoon salt
  • 1/4 teaspoon crushed red pepper
1. Place each chicken breast between two pieces of plastic wrap. Pound each lightly with the flat side of a meat mallet to make an even thickness (about 1/2 inch). Remove plastic wrap.
2. Place the chicken in a shallow dish. In a small bowl or small glass measure, combine remaining ingredients and pour over chicken. Cover and marinate 1 to 4 hours.
3. Place chicken on the rack of an uncovered grill directly over medium coals. Grill, uncovered, for 10 to 12 minutes or until an instant-read thermometer registers 170 degrees , turning once and brushing with marinade halfway through grilling time. Discard any remaining marinade.

Sunday, April 22, 2012

Baked Wisconsin Oatmeal

Makes: 4 to 6 servings Prep: 20 mins Cool: 30 mins Bake: 30 mins at 350°F

  • Butter
  • 1 3/4 cups water
  • 1/8 teaspoon salt
  • 1 cup rolled oats
  • 2/3 cup milk
  • 2 eggs, lightly beaten
  • 1/2 cup packed brown sugar
  • 1 teaspoon baking powder
  • 1 teaspoon ground cinnamon
  • 1/4 teaspoon salt
  • Milk or half-and-half (optional)

Directions

1. Lightly butter a 1-1/2-quart casserole; set aside. For oatmeal, in a medium saucepan, bring water and 1/8 teaspoon salt to boiling. Slowly stir in oats. Return to boiling; reduce heat. Simmer, uncovered, for 2 to 3 minutes for quick-cooking rolled oats or 5 to 7 minutes for regular rolled oats or until most of the water is absorbed and the oats are tender, stirring occasionally. Set aside.

2. In a small bowl, whisk milk and eggs until well combined; set aside. In another small bowl, stir together brown sugar, baking powder, cinnamon and 1/4 teaspoon salt. Stir brown sugar mixture into oatmeal. Fold egg mixture into oatmeal mixture. Pour oatmeal mixture into prepared casserole.

3. Bake, uncovered, in a 350 degree F oven for 30 to 40 minutes or until center is just set and a cinnamon-sugar crust forms on top. Cool about 30 minutes. Serve warm with additional milk or half-and-half, if you like. Makes 4 to 6 servings.

Variation: Fruited Baked Oatmeal:  Prepare as directed above, except stir 2/3 to 3/4 cup raisins or golden raisins, snipped pitted dates or dried cranberries into brown sugar mixture. Continue as directed.

"Breaded" Pork Chops with Mustard Sauce

  Recipe created by Kalyn but sauce inspired by a recipe in Dana Carpender's 500 Low-Carb Recipes.)


2 thick boneless pork chops
salt/pepper for seasoning pork chops
Penzey's Pork Chop Seasoning for seasoning pork chops (optional, but good. If you don't want to buy this, season the pork chops with a tiny bit of garlic powder.)
1/4 cup almond meal
1-2 T olive oil (will depend on your pan)
1/2 cup chicken stock
3 T half and half or milk
1 T Dijon mustard (or less, can also use milder flavored mustard if desired)

Instructions:
Trim all fat from pork chops, then put between saran wrap or inside a thick Ziploc bag and pound until 1/4 inch thick. For best results, pound the pork chops on both sides with spiky side of meat mallet. You may want to cut each flattened pork chop in half for more manageable sized pieces for frying.

Season pork chops on both sides with a tiny bit of salt, pepper, and Penzey's pork chops seasoning (or garlic powder). Put almond meal in a flat bowl and press pork chop into it, sprinkling almond meal over both sides of pork chop and pressing on until you have an even coating on each pork chop.

Heat olive oil with medium-high heat in pan big enough to hold all pork chops, then add pork chops and saute over medium heat until well browned and cooked through, about 8 minutes. Turn them a couple of times and be sure not to have the heat too high or the almond meal will burn. Quite a bit of the coating will fall off, but don't worry, there will still be enough left on to give a good brown color to the pork chops. The part that falls off gives a delicious nutty flavor to the sauce.

Remove pork chops to plate and cover to keep warm if desired. Turn up heat in pan and add chicken stock, scraping pan until all the browned bits of almond meal are loosened. Cook about 2 minutes over high heat, then lower heat to medium low and whisk in mustard, then half and half. Cook sauce at a very low simmer 1-2 minutes more. Pour sauce over pork chops and serve.


This printable recipe from KalynsKitchen.com.

Make the Most Tender, Flavorful Steak Recipe

This recipe comes from a WONDERFUL blog, The Steamy Kitchen Food Blog - unfortunately, I can not get the link to work so please search forher blog... you'll be glad you did.

She shares her way to make an exceptionally tender and flavorful steak.   Her recipe is below.


 So, my friends, I am offering you a very juicy secret, one that will turn an ordinary “Choice” cut of steak into a gucci “Prime” cut (And yes, I know what “Choice” and “Prime” means – it’s the marbling. The salting doesn’t affect fat content – I’m using those terms as a figure of speech and something people can relate to)
Do you know the joy of buying Choice and eating Prime? It’s like buying a Hyundai and getting a free mail-in rebate for a BMW upgrade!!!

The Steak Secret: massively salt your steaks 1 hour before cooking for every inch of thickness.

Notice that I didn’t say, “sprinkle liberally” or even “season generously.” I’m talking about literally coating your meat. It should resemble a salt lick.
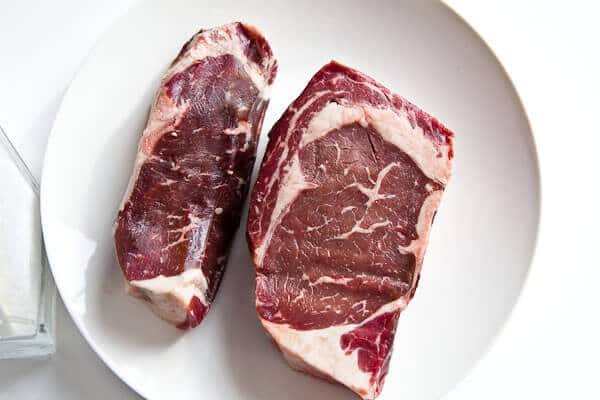
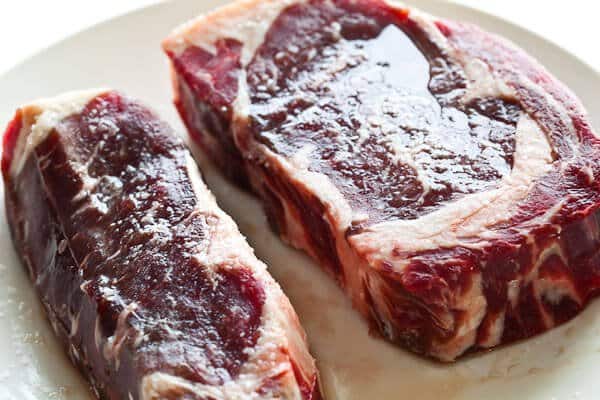
Here’s two nice pieces of regular ‘ol supermarket steak. They’re about 1.25 inches thick, so I’ll let them salt for about 1.25 hours.

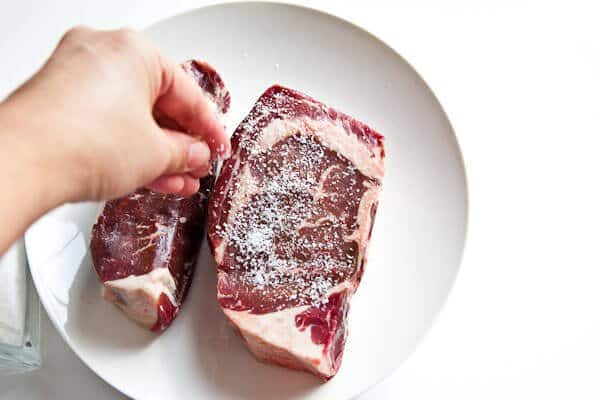
Season liberally with kosher salt on both sides:


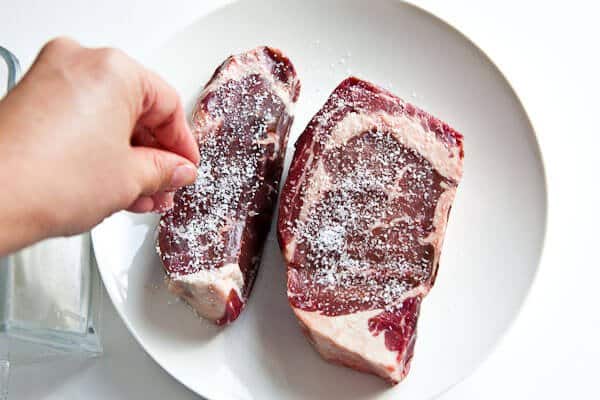
And then just let it sit on your counter.
After 15 minutes, it will look like this — you can see how the meat’s water is starting to come up to the surface — and that some of the salt is still on the surface of the steak.

After 30 minutes, you’ll see more water:

After almost an hour:

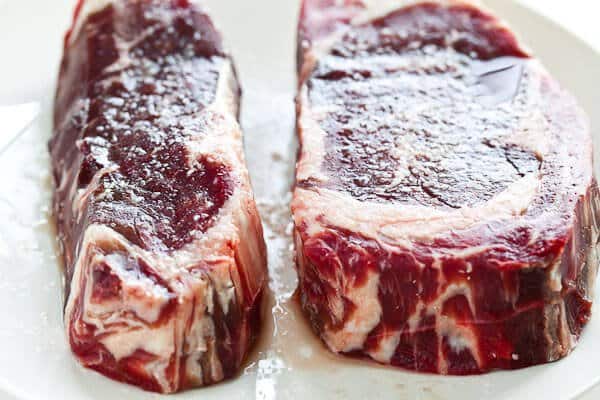
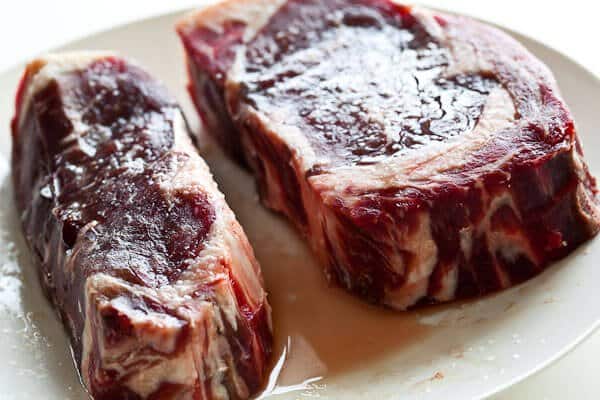
And now 1.25 hours – see all that water?  You can also see that there’s still salt on the surface of the steak.

The next step is to discard the water, rinse the steak really well to rid of all the salt. Pat very dry. Very very dry with clean paper towels so that absolutely no moisture is left on the steak.
Then it’s time to cook.
Before y’all throw a hissy fit, just hear me out. I first learned of this technique from Judy Rodgers’ The Zuni Cafe Cookbook: A Compendium of Recipes and Cooking Lessons from San Francisco’s Beloved Restaurant. Judy massively salts her chicken before roasting, and I’ve adapted the practice to steaks. Thanks to a couple of other books (McGee’s On Food and Cooking and Alton Brown’s I’m Just Here For the Food), and a few fellow bloggers, I have an explanation of how it works.
Oh, and if the drawings look like a 3rd grader did it, too bad….YOU try drawing with a laptop touch-pad and a glass of bourbon on the rocks.

How Salting Works

How Salting Steaks Work
All of you who season JUST before grilling – this is what you are really doing to the meat. Did you know that? All the water comes to the surface and if you don’t pat super-dry, you’re basically STEAMING the meat. Plus, your salt just sits on the surface of the steak, leaving the interior tasteless.
How Salting Steaks Work
Now – note that only a little of the salt gets to go back into the meat. Don’t worry – you aren’t going to be eating all that salt!
How Salting Steaks Work
Bourbon does that to me too.
How Salting Steaks Work
I can hear it now..BUT!!! What of all the water that stayed on the surface of the meat? Aren’t you drawing all the moisture out of the meat? Will it taste like a salt lick? (*%!*%!@#!#!!! I DON’T UNDERSTAND THIS STEAK RECIPE!!!
Pull your pants back on and keep reading…
How Salting Steaks Work

Verification on Technique

How Salting Steaks Work
Cook’s Illustrated January 08 issue (and you can also find it on their paid portion of their website. Just search for “Improving Cheap Roast Beef”) They salt a 4lb roast beef (big, fat, thick meat) and they are using 4 tsp kosher salt – therefore their steak recipe recommends salting for 18-24 hrs. It’s all related: thickness of meat : amount of salt : time.

Salting Steak Recipe Key Points

  • Use kosher or sea salt, not table salt <– that is important. It will not work well with tiny tiny grains of table salt. Plus, table salt tastes like shit.
  • Use steaks 1″ or thicker.
  • Follow my timetable (below)
  • If you are Harold McGee, a member of Alton Brown’s research team or Mr. Burke my high school chem teacher…..and think I’m full of B.S…. please let me know. But guys, none of this was in your books. I had to formulate, extrapolate, hypotholate and guesstulate based on your stuff. Highly mental activity.
  • I know this sounds awfully like salt-curing, which dries out meat (like beef jerky). But with salt curing, you use A LOT more salt and leave it salting for A LOOOOOONG time. We’re talking about a little tiny nap here – not weeks – just enough to break down the proteins and flavor the steak throughout.
  • Again, don’t worry about all that salt. Just enough of it gets absorbed into the meat. Most of it gets washed down the drain when you rinse off. Really.
  • I know you’re going to ask…so I’ll answer it for you. Why not brine? You could if you really want water-logged diluted-tasting crappy steak.
I understand that this method will cause chaos, confusion and controversy in your household. But I encourage you to experiment: try adding spices, crushed garlic and rosemary sprigs to the salt, which will then act like Christina Aguilera dragging its entourage of flavors with it into the meat. If confusion in the household becomes unbearable, just whack’em with the hunk of salted steak..
Grilled Steak Recipe with Garlic-Herb Butter


Rosemary Pork Tenderloin - Low Carb

An easy and delicious pork tenderloin recipe.

Cook Time: 20 minutes

2 pork tenderloins, about 2 pounds
3 tablespoons fresh rosemary, or about 1 tablespoon dried
1 tablespoon olive oil
2 cloves garlic, halved
salt and pepper to taste

Preheat oven to 400°. Line a baking pan with foil, spray with cooking spray and place in oven. Trim fat from pork tenderloins and butterfly the meat, cutting them nearly in half lengthwise. Open the pork tenderloins and lay out, pounding to flatten with the palm of the hand or the bottom of a heavy skillet. Chop rosemary if using fresh. Rub pork tenderloins all over with cut sides of garlic halves then olive oil, then sprinkle rosemary on both sides.

Remove baking pan from the oven and place pork on hot tray. Return to oven and roast for about 20 minutes (about 155° to 160° internal temp). Remove and let stand 5 minutes, then slice.

Crispy Microwave Potato Chips

This recipe comes from the Fat and Happy Food Blog... please visit her blog, it has a lot of different  recipes you won't find on everyday recipe sites.

Fat and Happy Food Bog Tips and Techniques: It's extremely important to slice the potatoes thin and even; a mandolin is the best tool for this task. It will take a steady hand and patience, but you can use a knife.


Crispy Microwave Potato Chips

Potatoes (raw)
  Salt, pepper (or other seasonings)
Parchment paper
Scrub the outside of the potatoes...any variety will do, she even used the purple ones!

Set the mandolin on the thinnest setting and slice the vegetables (or carefully use a knife). You may want to do a trial and error depending on how thin your mandolin goes.

Line the glass microwave plate with parchment paper. Lay out the slices onto the paper, do not overlap them but they can be touching. Sprinkle with with a little salt; I like to add pepper too.

Microwave on high for 5 minutes. Keep an eye on the potatoes, if they start to brown too much before the 5 minutes is up then turn the power off. Do not open the door. Let the potato chips rest for 1 minute. Then start the microwave again for 2 more minutes. Remove and enjoy!


Notes:

All microwaves are going to cook slightly different so make necessary adjustments after the first batch. If they get too dark you will notice a bit of a burnt flavor.

 She suggests you try a little garlic salt, cayenne or even chili powder for seasoning.