Showing posts with label low carb. Show all posts

Sunday, August 17, 2014

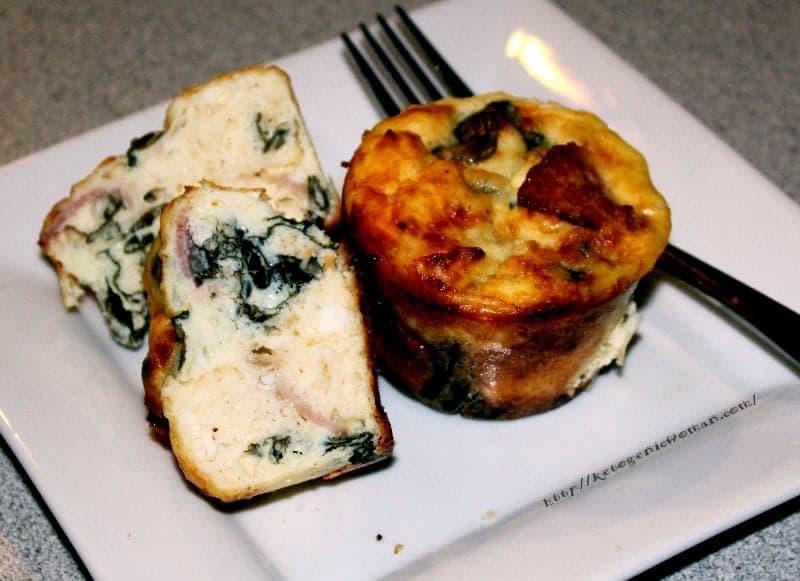
Keto Spinach Feta Muffins

This recipe is from the fabulous Ketogenic woman. Check out her website!  
This recipe makes 6 breakfast size muffins.  A man might eat 2 or 3, I was satisfied with one.  You will need a 6 cup muffin tin.  I highly recommend this silicone pan, they pop right out every time!

Recipe: Keto Spinach Feta Muffins

Keto Spinach Feta Muffins
  • 6 eggs
  • 3 slices bacon, cooked
  • 2 cups raw spinach
  • 1 cup crumbled feta cheese
  • 1/2 c cheddar cheese
  • salt and pepper to taste
Preheat oven to 350.  Rinse the spinach under cold water, drain and place in a microwave safe bowl.  Microwave the spinach on high for 1 minute. (there will be enough moisture left on the rinsed leaves to cook the spinach).  Set aside to cool.
If you happen to have leftover cooked bacon, you could use that.  But who am I kidding, nobody has leftover cooked bacon.  You will have to chop this bacon up and fry it until it’s how you like it.  Set aside to cool.
In a medium mixing bowl, whisk the eggs together until frothy. Add in the crumbled feta cheese and the grated cheddar cheese.  Once the spinach and bacon are cooled enough, add them to the bowl and mix until combined.
Divide the mixture evenly among the 6 muffin cups.  Bake for 30-35 minutes until muffins are firm.
Nutritional information for each muffin:
Calories 220, Fat 16, Protein 12, Carbs 3   Ratio 71/24/5
Adding a tbsp butter will bring it to 80/16/4.
These Keto Spinach Feta Muffins are a perfect take along to work breakfast, easy to pack and easy to eat.  They actually taste better than the Starbucks wrap, and are gluten free, low carb and sugar free. Can’t beat that!

Saturday, June 21, 2014

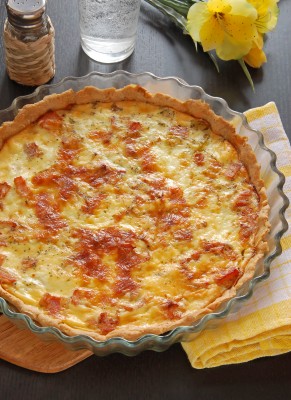
Low Carb Quiche Recipes - Crustless

Low Carb Quiche Recipes

10 or 9 inch quiche or pie pan
Any medium melting cheese works well in these quiche recipes. I prefer milder cheeses like muenster or havarti, but cheddar, swiss, monterey jack and gouda are also good choices. The egg-cheese mixture doesn't stick, as long as you butter the pan.

Basic Cheese and Onion Quiche

Makes 2 quiches.
  • 5-6 cups shredded muenster and/or colby jack cheese, divided in half
  • 2 tablespoons butter plus more for greasing pans
  • 1 large white onion, finely chopped
  • 12 large eggs, preferably organic or free range eggs
  • 2 cups heavy cream
  • 1 tsp salt
  • 1 tsp ground black pepper
  • 2 tsp dried thyme
Directions:
  1. Preheat oven to 350 degrees.
  2. In a separate skillet, add the butter and melt over medium-low heat. Add the vegetables and saute until onions are translucent and soft. Remove from heat and cool.
  3. Butter two 10 inch quiche pans or deep pie pans. Put 2 cups of shredded cheese in bottom of each buttered pan. Add 1/2 of cooled vegetable mixture to each pan in an even layer over cheese.
  4. Crack 12 eggs and pour into a large mixing bowl. Add the cream and spices, and whisk together until well mixed and frothy. Pour 1/2 mixture over each pan of cheese and veggies, then use a fork to gently and evenly distribute cheese and vegetables into egg and cream mixture.
  5. Slide quiche pans into oven, leaving an inch of space between pans. Bake for about 20-25 minutes or until set and puffy and slightly golden in the center. You can also use a knife to insert into middle of one of the quiches, and if it comes out clean, they are done.
  6. Cut each quiche into 6 equal sized servings for a total of 12 servings. Serve immediately, or cool and refrigerate or freeze. These will keep in the freezer for a two weeks, or the refrigerator for a week.
Nutrition: Serving size = 1/6 of a quiche. Each serving has 382 calories, 16 grams of protein, 33 grams of fat, 5 grams of carbohydrate and 1 gram of fiber.
  • Cheese, Onion and Bacon Quiche: Place 12 slices of raw bacon on a cookie sheet and bake at 350 degrees for 20 minutes or until slightly crispy. Cool, then process into fine bits in a food processor. Add to the egg and cream mixture in step 4 above. Nutrition: Serving size = 1/6 of quiche. Each serving has 390 calories, 19 grams of protein, 34 grams of fat, 6 grams of carbohydrate and 1 gram of fiber.
  • Cheese, Onion and Sausage Quiche: Cook 6 ounces pork breakfast sausage in separate skillet until done. Cool and crumble, and add 4 ounces cooked sausage to the egg and cream mixture in step 4 above.Nutrition: Serving size = 1/6 of quiche. Each serving has 380 calories, 17 grams of protein, 34 grams of fat, 6 grams of carbohydrate and .5 gram of fiber.
  • Veggie Quiche: Add your choice of finely chopped extra vegetables in step 2 and saute along with onions. Any low carb vegetable works; try shredded carrots, broccoli, cauliflower, peppers, celery, summer squash, etc. This will be higher in carbohydrate count depending on veggies used. Add 1 gram of carbohydrate to each serving for every cup of raw vegetables added.
  • Kitchen Sink Quiche: mix and match minced smoked ham, bacon, sausage and any vegetables using methods above. Quiche is almost like a pizza in a way, in that you can add just about anything you have on hand, if you think it will taste good in combination. Adjust nutrition counts as needed.
  • I hope you enjoy these low carb quiche recipes. I've been making them a long time and have finally hit on a recipe that tastes great every time, reheats well, and keeps in the fridge for a week or two.

    Sunday, March 23, 2014

    Mushroom Mozzarella Bake


    This recipe came from a great low carb website -http://low-carb-news.blogspot.com/

    lb fresh mushrooms, sliced (0.454 kg)
    3 tbsp butter (45 mL)
    3/4  tsp seasoning salt (3 mL)
    2 tbsp whipping cream (30 mL)
    1 tsp dried parsley (5 mL)
    1/4  tsp black pepper (1 mL)
    3/4  cup grated Mozzarella cheese (175 mL)

    Preheat oven to 350°F (180°C).


    In large frying pan or electric frying pan with lid, fry mushrooms in butter over medium heat until softening.  Keep cooking until water evaporates. Remove lid of pan.  Add seasoning salt; stir-fry until mushrooms are nice and brown. Add whipping cream, parsley and black pepper.  Allow to simmer over low heat until whipping cream reduces a bit.  This can happen extremely fast.  Arrange mushrooms in shallow casserole dish.  Sprinkle with cheese.  Bake 10 minutes, or until cheese is melted.  

    Yield:  6 servings
    1 serving
    127.3 calories
    4.6 g protein
    11.0 g fat
    3.1 g carbs

    Monday, April 23, 2012

    Easy Balsamic Chicken - Low Carb

    From Midwest Living 

    Makes: 4 servings Prep: 10 mins Marinate: 1 hr to 4 hrs Grill: 10 mins to 12 mins
    • 4 skinless, boneless chicken breast halves (about 1 pound total)
    • 1/4 cup balsamic vinegar
    • 1/4 cup olive oil
    • 3 cloves garlic, minced
    • 1/4 teaspoon salt
    • 1/4 teaspoon crushed red pepper
    1. Place each chicken breast between two pieces of plastic wrap. Pound each lightly with the flat side of a meat mallet to make an even thickness (about 1/2 inch). Remove plastic wrap.
    2. Place the chicken in a shallow dish. In a small bowl or small glass measure, combine remaining ingredients and pour over chicken. Cover and marinate 1 to 4 hours.
    3. Place chicken on the rack of an uncovered grill directly over medium coals. Grill, uncovered, for 10 to 12 minutes or until an instant-read thermometer registers 170 degrees , turning once and brushing with marinade halfway through grilling time. Discard any remaining marinade.

    Sunday, April 22, 2012

    "Breaded" Pork Chops with Mustard Sauce

      Recipe created by Kalyn but sauce inspired by a recipe in Dana Carpender's 500 Low-Carb Recipes.)


    2 thick boneless pork chops
    salt/pepper for seasoning pork chops
    Penzey's Pork Chop Seasoning for seasoning pork chops (optional, but good. If you don't want to buy this, season the pork chops with a tiny bit of garlic powder.)
    1/4 cup almond meal
    1-2 T olive oil (will depend on your pan)
    1/2 cup chicken stock
    3 T half and half or milk
    1 T Dijon mustard (or less, can also use milder flavored mustard if desired)

    Instructions:
    Trim all fat from pork chops, then put between saran wrap or inside a thick Ziploc bag and pound until 1/4 inch thick. For best results, pound the pork chops on both sides with spiky side of meat mallet. You may want to cut each flattened pork chop in half for more manageable sized pieces for frying.

    Season pork chops on both sides with a tiny bit of salt, pepper, and Penzey's pork chops seasoning (or garlic powder). Put almond meal in a flat bowl and press pork chop into it, sprinkling almond meal over both sides of pork chop and pressing on until you have an even coating on each pork chop.

    Heat olive oil with medium-high heat in pan big enough to hold all pork chops, then add pork chops and saute over medium heat until well browned and cooked through, about 8 minutes. Turn them a couple of times and be sure not to have the heat too high or the almond meal will burn. Quite a bit of the coating will fall off, but don't worry, there will still be enough left on to give a good brown color to the pork chops. The part that falls off gives a delicious nutty flavor to the sauce.

    Remove pork chops to plate and cover to keep warm if desired. Turn up heat in pan and add chicken stock, scraping pan until all the browned bits of almond meal are loosened. Cook about 2 minutes over high heat, then lower heat to medium low and whisk in mustard, then half and half. Cook sauce at a very low simmer 1-2 minutes more. Pour sauce over pork chops and serve.


    This printable recipe from KalynsKitchen.com.

    Make the Most Tender, Flavorful Steak Recipe

    This recipe comes from a WONDERFUL blog, The Steamy Kitchen Food Blog - unfortunately, I can not get the link to work so please search forher blog... you'll be glad you did.

    She shares her way to make an exceptionally tender and flavorful steak.   Her recipe is below.


     So, my friends, I am offering you a very juicy secret, one that will turn an ordinary “Choice” cut of steak into a gucci “Prime” cut (And yes, I know what “Choice” and “Prime” means – it’s the marbling. The salting doesn’t affect fat content – I’m using those terms as a figure of speech and something people can relate to)
    Do you know the joy of buying Choice and eating Prime? It’s like buying a Hyundai and getting a free mail-in rebate for a BMW upgrade!!!

    The Steak Secret: massively salt your steaks 1 hour before cooking for every inch of thickness.

    Notice that I didn’t say, “sprinkle liberally” or even “season generously.” I’m talking about literally coating your meat. It should resemble a salt lick.
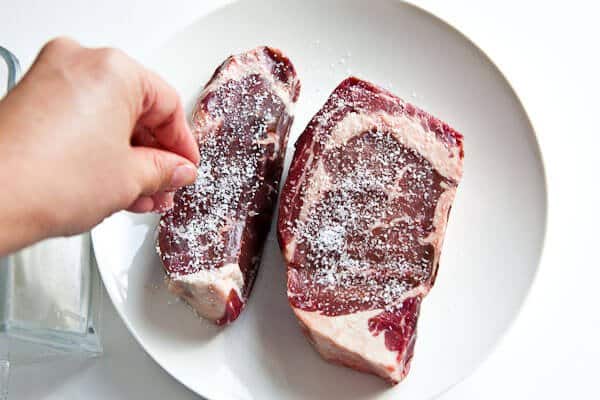
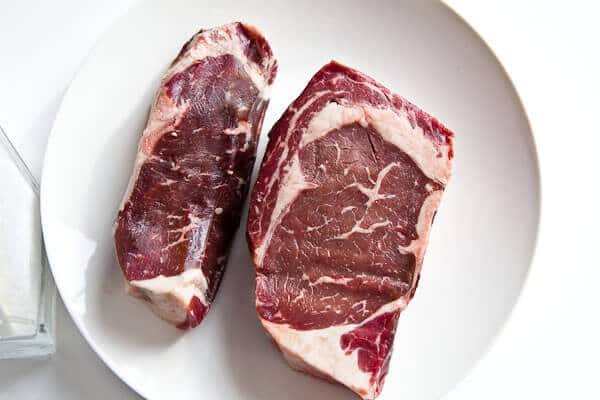
    Here’s two nice pieces of regular ‘ol supermarket steak. They’re about 1.25 inches thick, so I’ll let them salt for about 1.25 hours.
    Season liberally with kosher salt on both sides:
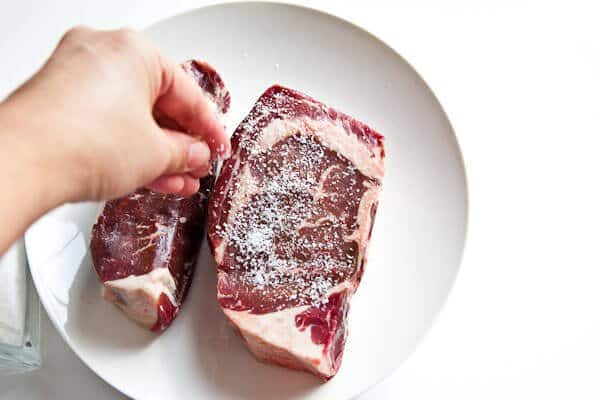

    And then just let it sit on your counter.
    After 15 minutes, it will look like this — you can see how the meat’s water is starting to come up to the surface — and that some of the salt is still on the surface of the steak.

    After 30 minutes, you’ll see more water:
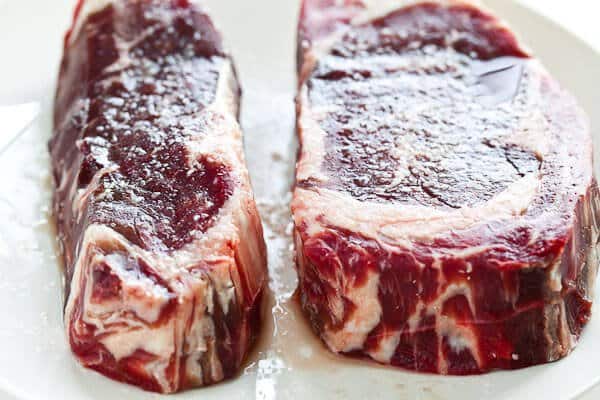
    After almost an hour:
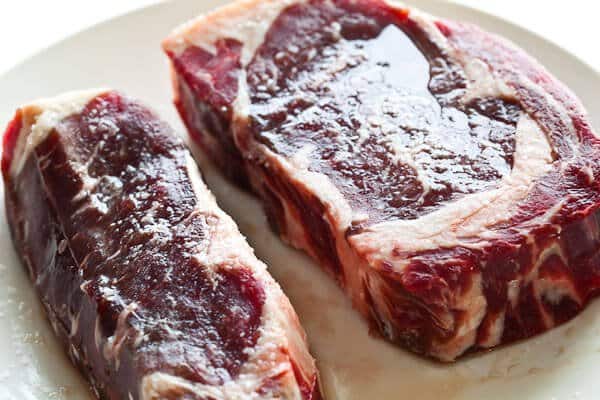
    And now 1.25 hours – see all that water?  You can also see that there’s still salt on the surface of the steak.
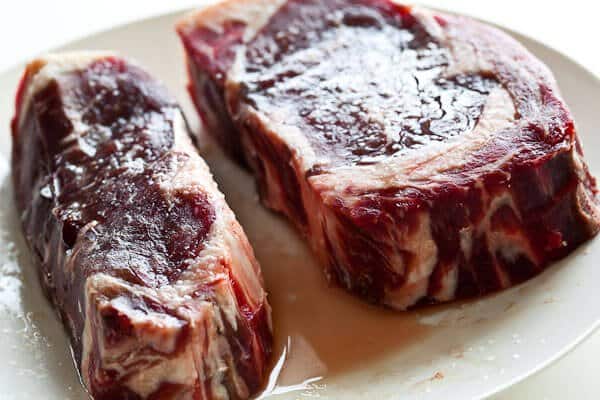
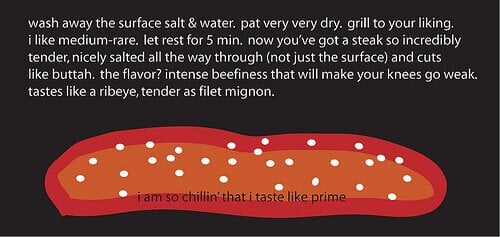
    The next step is to discard the water, rinse the steak really well to rid of all the salt. Pat very dry. Very very dry with clean paper towels so that absolutely no moisture is left on the steak.
    Then it’s time to cook.
    Before y’all throw a hissy fit, just hear me out. I first learned of this technique from Judy Rodgers’ The Zuni Cafe Cookbook: A Compendium of Recipes and Cooking Lessons from San Francisco’s Beloved Restaurant. Judy massively salts her chicken before roasting, and I’ve adapted the practice to steaks. Thanks to a couple of other books (McGee’s On Food and Cooking and Alton Brown’s I’m Just Here For the Food), and a few fellow bloggers, I have an explanation of how it works.
    Oh, and if the drawings look like a 3rd grader did it, too bad….YOU try drawing with a laptop touch-pad and a glass of bourbon on the rocks.

    How Salting Works
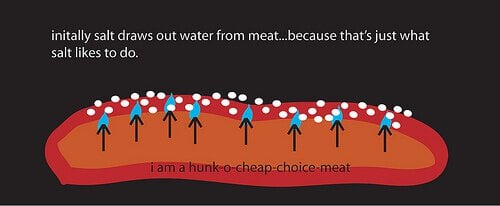
    How Salting Steaks Work
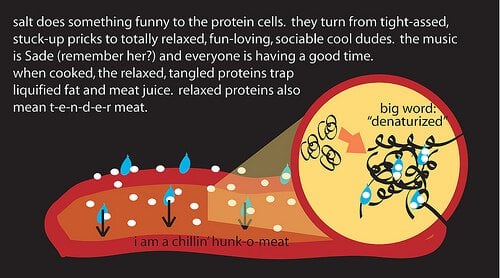
    All of you who season JUST before grilling – this is what you are really doing to the meat. Did you know that? All the water comes to the surface and if you don’t pat super-dry, you’re basically STEAMING the meat. Plus, your salt just sits on the surface of the steak, leaving the interior tasteless.
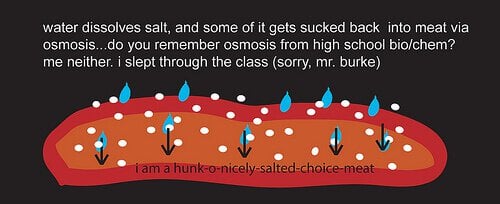
    How Salting Steaks Work
    Now – note that only a little of the salt gets to go back into the meat. Don’t worry – you aren’t going to be eating all that salt!
    How Salting Steaks Work
    Bourbon does that to me too.
    How Salting Steaks Work
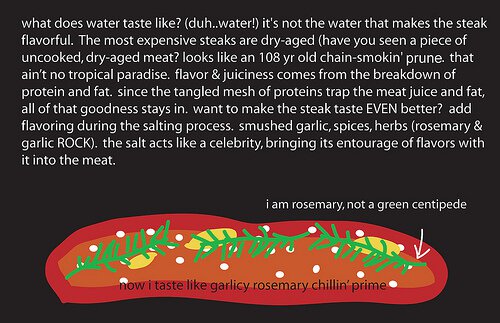
    I can hear it now..BUT!!! What of all the water that stayed on the surface of the meat? Aren’t you drawing all the moisture out of the meat? Will it taste like a salt lick? (*%!*%!@#!#!!! I DON’T UNDERSTAND THIS STEAK RECIPE!!!
    Pull your pants back on and keep reading…
    How Salting Steaks Work

    Verification on Technique

    How Salting Steaks Work
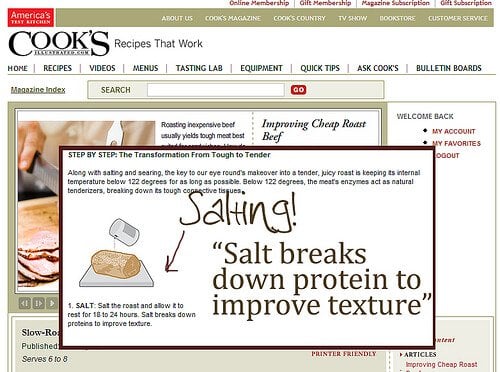
    Cook’s Illustrated January 08 issue (and you can also find it on their paid portion of their website. Just search for “Improving Cheap Roast Beef”) They salt a 4lb roast beef (big, fat, thick meat) and they are using 4 tsp kosher salt – therefore their steak recipe recommends salting for 18-24 hrs. It’s all related: thickness of meat : amount of salt : time.

    Salting Steak Recipe Key Points

    • Use kosher or sea salt, not table salt <– that is important. It will not work well with tiny tiny grains of table salt. Plus, table salt tastes like shit.
    • Use steaks 1″ or thicker.
    • Follow my timetable (below)
    • If you are Harold McGee, a member of Alton Brown’s research team or Mr. Burke my high school chem teacher…..and think I’m full of B.S…. please let me know. But guys, none of this was in your books. I had to formulate, extrapolate, hypotholate and guesstulate based on your stuff. Highly mental activity.
    • I know this sounds awfully like salt-curing, which dries out meat (like beef jerky). But with salt curing, you use A LOT more salt and leave it salting for A LOOOOOONG time. We’re talking about a little tiny nap here – not weeks – just enough to break down the proteins and flavor the steak throughout.
    • Again, don’t worry about all that salt. Just enough of it gets absorbed into the meat. Most of it gets washed down the drain when you rinse off. Really.
    • I know you’re going to ask…so I’ll answer it for you. Why not brine? You could if you really want water-logged diluted-tasting crappy steak.
    I understand that this method will cause chaos, confusion and controversy in your household. But I encourage you to experiment: try adding spices, crushed garlic and rosemary sprigs to the salt, which will then act like Christina Aguilera dragging its entourage of flavors with it into the meat. If confusion in the household becomes unbearable, just whack’em with the hunk of salted steak..
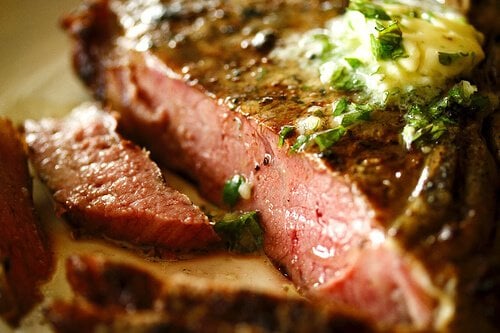
    Grilled Steak Recipe with Garlic-Herb Butter


    Rosemary Pork Tenderloin - Low Carb

    An easy and delicious pork tenderloin recipe.

    Cook Time: 20 minutes

    2 pork tenderloins, about 2 pounds
    3 tablespoons fresh rosemary, or about 1 tablespoon dried
    1 tablespoon olive oil
    2 cloves garlic, halved
    salt and pepper to taste

    Preheat oven to 400°. Line a baking pan with foil, spray with cooking spray and place in oven. Trim fat from pork tenderloins and butterfly the meat, cutting them nearly in half lengthwise. Open the pork tenderloins and lay out, pounding to flatten with the palm of the hand or the bottom of a heavy skillet. Chop rosemary if using fresh. Rub pork tenderloins all over with cut sides of garlic halves then olive oil, then sprinkle rosemary on both sides.

    Remove baking pan from the oven and place pork on hot tray. Return to oven and roast for about 20 minutes (about 155° to 160° internal temp). Remove and let stand 5 minutes, then slice.