Showing posts with label make ahead. Show all posts

Saturday, June 21, 2014

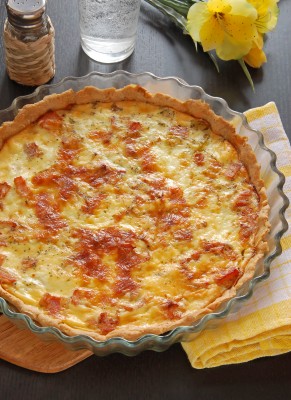
Low Carb Quiche Recipes - Crustless

Low Carb Quiche Recipes

10 or 9 inch quiche or pie pan
Any medium melting cheese works well in these quiche recipes. I prefer milder cheeses like muenster or havarti, but cheddar, swiss, monterey jack and gouda are also good choices. The egg-cheese mixture doesn't stick, as long as you butter the pan.

Basic Cheese and Onion Quiche

Makes 2 quiches.
  • 5-6 cups shredded muenster and/or colby jack cheese, divided in half
  • 2 tablespoons butter plus more for greasing pans
  • 1 large white onion, finely chopped
  • 12 large eggs, preferably organic or free range eggs
  • 2 cups heavy cream
  • 1 tsp salt
  • 1 tsp ground black pepper
  • 2 tsp dried thyme
Directions:
  1. Preheat oven to 350 degrees.
  2. In a separate skillet, add the butter and melt over medium-low heat. Add the vegetables and saute until onions are translucent and soft. Remove from heat and cool.
  3. Butter two 10 inch quiche pans or deep pie pans. Put 2 cups of shredded cheese in bottom of each buttered pan. Add 1/2 of cooled vegetable mixture to each pan in an even layer over cheese.
  4. Crack 12 eggs and pour into a large mixing bowl. Add the cream and spices, and whisk together until well mixed and frothy. Pour 1/2 mixture over each pan of cheese and veggies, then use a fork to gently and evenly distribute cheese and vegetables into egg and cream mixture.
  5. Slide quiche pans into oven, leaving an inch of space between pans. Bake for about 20-25 minutes or until set and puffy and slightly golden in the center. You can also use a knife to insert into middle of one of the quiches, and if it comes out clean, they are done.
  6. Cut each quiche into 6 equal sized servings for a total of 12 servings. Serve immediately, or cool and refrigerate or freeze. These will keep in the freezer for a two weeks, or the refrigerator for a week.
Nutrition: Serving size = 1/6 of a quiche. Each serving has 382 calories, 16 grams of protein, 33 grams of fat, 5 grams of carbohydrate and 1 gram of fiber.
  • Cheese, Onion and Bacon Quiche: Place 12 slices of raw bacon on a cookie sheet and bake at 350 degrees for 20 minutes or until slightly crispy. Cool, then process into fine bits in a food processor. Add to the egg and cream mixture in step 4 above. Nutrition: Serving size = 1/6 of quiche. Each serving has 390 calories, 19 grams of protein, 34 grams of fat, 6 grams of carbohydrate and 1 gram of fiber.
  • Cheese, Onion and Sausage Quiche: Cook 6 ounces pork breakfast sausage in separate skillet until done. Cool and crumble, and add 4 ounces cooked sausage to the egg and cream mixture in step 4 above.Nutrition: Serving size = 1/6 of quiche. Each serving has 380 calories, 17 grams of protein, 34 grams of fat, 6 grams of carbohydrate and .5 gram of fiber.
  • Veggie Quiche: Add your choice of finely chopped extra vegetables in step 2 and saute along with onions. Any low carb vegetable works; try shredded carrots, broccoli, cauliflower, peppers, celery, summer squash, etc. This will be higher in carbohydrate count depending on veggies used. Add 1 gram of carbohydrate to each serving for every cup of raw vegetables added.
  • Kitchen Sink Quiche: mix and match minced smoked ham, bacon, sausage and any vegetables using methods above. Quiche is almost like a pizza in a way, in that you can add just about anything you have on hand, if you think it will taste good in combination. Adjust nutrition counts as needed.
  • I hope you enjoy these low carb quiche recipes. I've been making them a long time and have finally hit on a recipe that tastes great every time, reheats well, and keeps in the fridge for a week or two.

    Tuesday, May 3, 2011

    Butterfinger Pie

    • 2 cups milk
    • 1 quart vanilla ice cream
    • 2 (3.5-ounce) packages instant vanilla pudding
    • 1/2 cup butter
    • 1 1/2 cups crushed Graham cracker crumbs
    • 1/2 cup crushed saltine crackers
    • 1 (8-ounce) container whipped topping
    • 4 (2-ounce) Butterfinger bars, crushed
    Combine milk, ice cream and dry pudding mix in a large bowl and beat until well mixed. Place in refrigerator. Melt butter in saucepan; pour over cracker crumbs in a large bowl. Stir well. Pour into a 13-by-9-inch pan, patting into an even layer on bottom and reserving 1/3 of mixture for topping. Pour ice cream mixture over crust. Freeze 1 hour. Spread whipped topping over filling. Mix crushed Butterfingers with reserved crumb mixture. Sprinkle over top and return to freezer to set. Garnish with chocolate sauce if desired. Serves 10 to 12.

    Friday, December 10, 2010

    Use Your Freezer and Take Some of the Work Out of Christmas Cookies

    From the wondeful folks at King Arthur Flour

    Place the following in a mixing bowl, and beat until combined:


    1/2 cup butter

    1/2 cup vegetable shortening

    3/4 cup light brown sugar, packed

    1/2 cup granulated sugar

    1 1/2 teaspoons baking powder

    1 1/2 teaspoons cinnamon

    1 1/2 teaspoons ground ginger

    1/2 teaspoon ground allspice or ground cloves

    3/4 teaspoon salt


    Add 1 large egg, and 2 tablespoons molasses.
    Beat until smooth. Amazing how that one egg smooths things out, eh?

    Add 1 1/2 cups King Arthur Unbleached All-Purpose Flour. Mix until thoroughly combined, then add an additional 1 1/2 cups flour, for a total of 3 cups. Add 3 tablespoons cornstarch, along with the second batch of flour.

    Mix to combine.

    See how dry this looks? Scrape the bowl, and continue to mix……until everything looks well mixed, with no dry spots.

    Divide the dough in half, flattening each half slightly to make a disk. Wrap in plastic, and refrigerate for 1 hour, or overnight. This chilling period will make the dough easier to handle.

    Preheat the oven to 350°F.

    Take one piece of dough out of the refrigerator, and place it on a piece of half-sheet parchment (16 1/2” x 12 1/4”).

    If you don’t have parchment, place the dough on a lightly floured work surface.

    Roll it 1/8” to 1/4” thick. A thinner cookie will be crisper; a thicker cookie, more solid/soft (though not bendy soft; just softer than crisp).

    Draw a mental line down the center of the sheet; or actually cut your dough in half, using a knife or pizza cutter. Your goal is to cut cookies that will fall on one or the other half of the paper; you’ll see why in a minute.

    Cut out cookies, removing and saving the dough between them. You’ll re-roll and cut these scraps.

    As the dough gets warmer, it gets trickier to remove the crooked, awkward pieces of dough in between cutouts; a toothpick helps.

    Now, take a pair of scissors and cut that sheet of parchment right down the middle.

    If you like, you can start with a half-sheet of parchment, rather than rolling on a full sheet and then cutting; you’ll just need to use a smaller piece of dough.

    As you continue to roll out dough and cut cookies, lay the sheets of cookies into a 9” x 13” pan. Continue until you’ve used all the dough.

    If you prefer rolling cookies on a floured surface, you can pick them up and transfer them to the parchment in the pan. If you don’t have parchment, substitute waxed paper or foil.

    Why roll directly on the parchment? It’s great for sticky dough, and/or intricate shapes. It’s easier to pick up a piece of parchment with cutout cookies than it is to successfully move delicate cookies from your rolling surface to a pan.

    Next, cover the pan with plastic wrap (or a shower cap), and place it in the freezer. Once the cookies are frozen, you can leave the pan in the freezer; or, to save space (and get your pan back), remove the pan from the freezer, quickly peel the cookies off the parchment, and store them in a zip-top bag.

    I say quickly because you don’t want cookies defrosting and getting soft; they’ll stick together in the bag.

    Ready to bake?

    Remove the cookies from the freezer. If you’ve kept them on the parchment, simply transfer cookies, parchment and all, to a baking sheet.


    If the frozen cookies have been bagged, take the bag out of the freezer, and quickly place the frozen cookies on a parchment-lined baking sheet.

    Do you see the word “parchment” being used constantly here? It’s the test kitchen’s best friend – and it should be yours, too. There’s nothing like parchment for keeping pans clean, moving stuff around, storage, preventing sticking, and a host of other uses.

    A single piece of parchment can be used over and over again, too. What’s not to like?!
    Bake the cookies just until they’re slightly brown around the edges, or until they feel firm, about 10 to 13 minutes.
    Remove them from the oven...edges are just slightly brown.
    When the cookies are completely cool, you can choose to decorate them – or not.
    Keep the cookies on the parchment–it works to keep the layers separate when you freeze hundreds of cookies/piecrusts/etc. You can stack them as high as you need to, and then freeze the plastic tub.

    If you are freezing any rolled dough, remember–get PARCHMENT. Look carefully in the foil/wrap section as many grocery stores carry it.

    Freezing dough on waxed paper will turn it to wet mush that can’t be peeled off. Wastes everything including your time.
    Sunday, May 16, 2010

    More Mocha Ice Cream Pie

    Bon Appétit   August 2000          Makes 12 servings

    Coffee ice cream, a chocolate-cookie crust and chocolate-covered coffee beans add up to a terrific party dessert. Begin making the cake one day before serving.

    CRUST
    26 chocolate wafer cookies (about 6 ounces), broken into pieces

    3 tablespoons unsalted butter, melted


    CENTER
    2 quarts coffee ice cream, slightly softened

    1/3 cup chocolate-covered coffee beans

    TOPPING

    2 1/4 cups chilled whipping cream

    1/2 teaspoon vanilla extract

    1 cup plus 2 tablespoons powdered sugar

    1/2 cup plus 1 tablespoon unsweetened cocoa powder


    GARNISH

    Milk chocolate shavings

    Instructions
    Blend cookies in processor until finely ground.
    Add melted butter; process until crumbs are moistened.
    Press crumb mixture onto bottom of 9-inch-diameter springform pan with 2 3/4-inch-high sides.

    Freeze until firm, about 10 minutes.

    CENTER - Place ice cream in large bowl. Finely chop coffee beans in processor. Add to bowl with ice cream; stir until well blended. Transfer ice cream mixture to crust-lined pan. Smooth top. Cover with plastic wrap. Freeze overnight.


    TOPPING
    Combine whipping cream and vanilla in another large bowl.
    Sift powdered sugar and cocoa over.
    Using electric mixer, beat until soft peaks form. Spread mixture over top of cake.

    Freeze until cream is set, at least 1 hour. (Can be made 2 days ahead. Cover; keep frozen.)

    Sprinkle chocolate shavings over top of cake.

    Run knife between pan sides and cake to loosen. Remove pan sides. Using small metal spatula or knife, smooth cake sides.

    Let cake stand at cool room temperature 10 minutes before serving.