Today’s bread comes to us from the inimitable M. F. K. Fisher, out of her book How To Cook A Wolf, published in 1942. Mrs. Fisher herself states it is the
grandest gingerbread recipe she has ever seen. Mrs. Fisher, suggests that it be served with ”unsalted butter, preferably
pressed into little pats.
Adapted from How To Cook A Wolf, by M. F. K. Fisher
Makes one 8 x 4 inch loaf
5 1/2 ounces (about 1 1/4 cups) unbleached all-purpose flour
1 teaspoon baking powder
1 teaspoon ground cinnamon
1 teaspoon ground ginger
1/4 teaspoon ground cloves
1/4 teaspoon salt
1/4 cup non-hydrogenated shortening
1/4 cup sugar
6 ounces (1/2 cup) molasses
3/4 teaspoon baking soda, divided
3/4 cup boiling water
1 large egg, beaten
2 tablespoons candied ginger, chopped finely
1. Preheat the oven to 325º F. Butter an 8 x 4 inch loaf pan, and
sprinkle with a spoonful of flour, knocking the pan to remove any
excess. Whisk together the flour, baking powder, cinnamon, ginger,
cloves, and salt.
2. In the bowl of a stand mixer, cream together the shortening and
the sugar with the paddle attachment, until thoroughly mixed. In a
separate bowl, beat the molasses and 1/2 teaspoon baking soda with a
nonstick spatula until light-colored and fluffy. Add the molasses to
the shortening mixture, and beat until combined, scraping the bowl down
as needed.
3. Add the remaining 1/4 teaspoon baking soda to the boiling water,
and stir to dissolve. Alternate adding the water and the dry
ingredients to the molasses mixture, in about three installments,
scraping the bowl after each addition. When thoroughly mixed, fold in
the beaten egg and the candied ginger.
4. Scrape the batter into the prepared pan, and bake at 325º F for
about 35 minutes, or until fully baked and the center of the loaf feels
firm when pressed gently on top. Begin checking the bread for doneness
after 20 minutes in the oven, so as to not burn. Let cool briefly in
the pan before turning out to cool thoroughly on a wire rack.
Notes:
1. Gingerbread will keep at room temperature, wrapped tightly, for up to a week. Frozen, it will keep for a month or so.
Showing posts with label food gifts. Show all posts
Showing posts with label food gifts. Show all posts
Sunday, August 14, 2011
Wednesday, May 4, 2011
Chocolate covered Caramel Pretzel Rods
Caramel
1 cup karo syrup
1 cup brown sugar
1 cup white sugar
1 cube of butter
1 can sweetened condensed milk
| |||||||||||||||||||||||||||||||||||||||||||||||||||||||||||||||||||||||||||
Put first 5 ingredients in a large sauce pan over
medium heat and stir until melted and combined.
Bring to a boil and stir
for five minutes. Be careful to keep stirring so that it doesn't start
to burn on the bottom of the pan.
Take caramel off the burner after 5
minutes.Put the hot caramel in a deep container. I used my Pyrex 4 cup
measuring cup
Prepare a couple cookie sheets lined with wax
paper.
Dip pretzel rod in caramel, about 3/4 of the way and let it drip
off any excess caramel.
Then lay the rod on the cookie sheet.Repeat with
remaining pretzels.
Put cookie sheets in the fridge to help set up caramel.Once caramel is set, lift up each pretzel rod off the wax paper and mold caramel around the rod since it will puddle on the sides as it cools.
Prepare the cookie sheets again with new pieces of
wax paper.
Melt chocolate in a deep container and dip caramel covered
pretzel rods.Place chocolate covered pretzel rods on cookie sheets and
place in fridge to set up.
Melt the vanilla candy melts in the microwave. When completely melted, use a knife to dip into the melted chocolate, then drizzle the chocolate on the rods.Place back into the fridge to set up.


Sunday, March 13, 2011
Chocolate Butter

How could anything that combined the two of these ingredients be anything but wonderful?
This recipe is on AmberLee's GiversLog.com - as an added bonus, if you are crafty, you will find a wealth of DIY instructions on there.... really a great site, she is so creative!
Thursday, November 25, 2010
Low Sodium Dill Dip Mix to Give as A Gift

Mix ahead and package in a small baggie with a header card stapled to it or put it in a sterilized baby food jar. To prepare, you simply add a few TABLESPOONS of this dip to sour cream and mayo for a wonderful vegetable dip.
Beau Monde Seasoning, made by Spice Island, is sometimes difficult to find...Kroger's carries it, if you can't find it you can make your own. (See below)
•1/2 cup dried dill weed
•1/2 cup dried minced onion
•1/2 cup dried parsley
•1/3 cup Beau Monde Seasoning
1/3 cup garlic powder
Combine all ingredients in a small bowl. Pour into tightly sealed container and store in a cool, dry place. Make sure to label container and attach instructions for use.
Dill Dip
1 cup mayonnaise or low-fat mayonnaise
1 cup sour cream or low-fat yogurt
3 Tbsp. Dill Dip Mix
A couple drops of Tabasco sauce - (will not make it spicy or hot)
1 green onion, finely sliced (optional)
Combine all ingredients in a medium bowl and blend until well mixed. If desired, chill for a few hours before serving to blend flavors.
Note: If you don't need to follow a low sodium diet, you can add a tsp of Lawry's seasoned salt to the mix
Homemade Beau Monde Seasoning
This recipe comes from About.com - I've never made it because I can find it in the grocery store. However, when I buy it, it is a finely ground powder, you might want to use a mortar and pestle to pulverize it when you use it in a recipe.

•1 tsp. ground cinnamon
•1 Tbsp. salt
•1 Tbsp. ground bay leaf
•1 Tbsp. ground allspice
•2 Tbsp. ground pepper
•1 Tbsp. ground white pepper
•1 tsp. ground nutmeg
•1 tsp. ground mace
•1 tsp. celery seed
Preparation:
In a small mixing bowl, mix together all ingredients. Pour into a tightly closed jar and store in a cool, dry place
Sunday, February 14, 2010
Jan's Beer Bread with Options
Who doesn't love options? To me, it's a large part of what makes cooking fun! This recipe has a lot of options.... and is wonderful as it is... makes a great gift as a mix or the finished bread. Enjoy!
3 cups unbleached flour – sifted (if you absolutely will not sift at least fluff your flour and spoon it into the measuring cup)
3 tsp baking POWDER
1 tsp. salt
¼ cup sugar
1 12 oz bottle beer ( flavor is different with each type of beer) I like Rolling Rock, Millers or Heiniken
Mix together until blended well… turn mixture into a greased loaf pan
Melt ¼ cup butter and pour over batter in pan -(can do as little as 2 TBSP but I prefer ¼ cup)
Bake at 350 degrees for 50 – 60 minutes depending on your oven.
Remove from pan and cool on a wire rack.
Beer Bread Variations
• For a “lighter” bread… mix and put in the pan and let it sit about 30 minutes or until it forms a crown before adding the butter – then add butter and bake
• Add a handful of Mexican blend cheeses ( cheddar and jack) before adding the beer
• Can sprinkle garlic salt on top of the bread half-way through baking – after removing from the oven, brush top lightly with butter and sprinkle with garlic salt.
• If you are salt sensitive – use Unsalted butter on top of the bread mixture
• Use Brown Sugar instead of white and add ½ tsp Onion Powder and 1 tsp Italian seasoning
Add 1 cup finely shredded cheddar, 1 tsp. Italian Seasoning and 1/2 tsp garlic powder
3 cups unbleached flour – sifted (if you absolutely will not sift at least fluff your flour and spoon it into the measuring cup)
3 tsp baking POWDER
1 tsp. salt
¼ cup sugar
1 12 oz bottle beer ( flavor is different with each type of beer) I like Rolling Rock, Millers or Heiniken
Mix together until blended well… turn mixture into a greased loaf pan
Melt ¼ cup butter and pour over batter in pan -(can do as little as 2 TBSP but I prefer ¼ cup)
Bake at 350 degrees for 50 – 60 minutes depending on your oven.
Remove from pan and cool on a wire rack.
Beer Bread Variations
• For a “lighter” bread… mix and put in the pan and let it sit about 30 minutes or until it forms a crown before adding the butter – then add butter and bake
• Can divide this dough into 2 small loaf pans –adjust baking time
• Use 1/3 cup sugar instead of ¼ cup
• For a sweeter bread, substitute brown sugar for white sugar • Add a handful of Mexican blend cheeses ( cheddar and jack) before adding the beer
• Can sprinkle garlic salt on top of the bread half-way through baking – after removing from the oven, brush top lightly with butter and sprinkle with garlic salt.
• Add ½ - 1 cup cup cheddar and ¼ cup chopped chilies
• Add ½ cup shredded cheese and ¼ cup sliced green olives• If you are salt sensitive – use Unsalted butter on top of the bread mixture
• Use Brown Sugar instead of white and add ½ tsp Onion Powder and 1 tsp Italian seasoning
Add 1 cup finely shredded cheddar, 1 tsp. Italian Seasoning and 1/2 tsp garlic powder
Sunday, January 24, 2010
Homemade Lemoncello or limoncello
(Italian Lemon Liqueur) is one of the most popular drinks today.
NOTE: Do not throw the lemons away - squeeze the juice out, add even quantities of Lemons juice and sugar and shake in a bottle until sugar is melted. This makes a wonderful cool drink especially if you use soda water to thin the syrup.
15 lemons - peeled with a potato peeler
2 bottles of 750 ml Vodka (100% proof)
5 cups water
4 cups sugar
Peel lemons with potato peeler (only the yellow/green peel). Place peels in a large glass jar and cover with one bottle of vodka. Leave in a cool place for 21 - 40 days.
Make syrup by mixing sugar and water over a medium heat. Keep stirring until sugar is melted, then cook syrup for 5 minutes. Cool down.
Strain lemon peel and add the liquid to the syrup together with second bottle of vodka. Mix well and bottle. Leave again for 40 days (if you can!!).
If the vodka is of a good quality, you can freeze the lemoncello.Serve over crushed ice.
NOTE: Do not throw the lemons away - squeeze the juice out, add even quantities of Lemons juice and sugar and shake in a bottle until sugar is melted. This makes a wonderful cool drink especially if you use soda water to thin the syrup.
15 lemons - peeled with a potato peeler
2 bottles of 750 ml Vodka (100% proof)
5 cups water
4 cups sugar
Peel lemons with potato peeler (only the yellow/green peel). Place peels in a large glass jar and cover with one bottle of vodka. Leave in a cool place for 21 - 40 days.
Make syrup by mixing sugar and water over a medium heat. Keep stirring until sugar is melted, then cook syrup for 5 minutes. Cool down.
Strain lemon peel and add the liquid to the syrup together with second bottle of vodka. Mix well and bottle. Leave again for 40 days (if you can!!).
If the vodka is of a good quality, you can freeze the lemoncello.Serve over crushed ice.
Autumn Apple Scones

This recipe is said to come from the Angel of the Garden Tea Room in Waynesville, OH
Makes 12 scones
2 cups flour
1/2 cup sugar
3 tsp baking powder
1/2 tsp baking soda
1/2 tsp salt
(I add 1 tsp cinnamon - optional)
1/2 stick butter
1/2 cup buttermilk
1 tsp vanilla
1 medium apple, peeled, cored, finely chopped
1/2 cup pecans, finely chopped (optional)
2 TBSP milk
3 TBSP superfine sugar
1/2 tsp cinnamon
Preheat Oven 425 degrees
In a medium bowl mix together - flour, sugar, baking powder, baking soda salt and cinnamon (optional).
Cut butter into dry ingredients until crumbly
Add buttermilk, vanilla, apples and pecans - mixture will be stiff. Stir together until dough is formed.
Divide dough in half
Shape each half into 6 scones
Place on baking sheetBrush tops with milk. Combine superfine sugar with cinnamon and sprinkle on top of scones.
Bake for 15 - 20 minutes until golden brown.
Serve warm with butter.
Sunday, December 20, 2009
She Loves Wine's Homemade Cranberry-Orange Liqueur
Nothing like a little homemade moonshine... there are lots of recipes out there for homemade Cranberry Liqueur... this is mine.
1 lb. Fresh Cranberries
3 cups of clear 60-80 proof liquor.
2 cups of sugar
1.5 cup water
1 navel orange - grate the peel and squeeze the juice
Large Sealing glass container
salt
Glass bottles with sealing lids
Create a simple syrup: Add 1.5 cup of water to the pot. Bring water to a slow boil. Slowly add the 2 cups of sugar. Stir constantly until the sugar is completely dissolved.
Put the berries in the blender or food processor and blend away.
Put the chopped cranberries in the pot. Simmer on low (really, really low) for about 5 minutes. Remove from heat and let stand until cool.(This takes a long time... remember it's in a sugar solution so it stays hot longer.

Select your Liquor. Most use vodka but, if you like rum (use clear), or gin better, use it. I don't use expensive vodka but I also don't use the kind you buy at the grocery store (varies by state, here in Ohio, you don't want the stuff they sell in the grocery store!) If you want to add a little kick, you can also add a couple shots of Bacardi 151 or Everclear at this point too... but I prefer it to taste like cranberry not alcohol.
Steeping: Put the cranberry/sugar mixture into a clean sterile jar. Add the liquor. Store in a cool dark place for 2 to 3 weeks. Shake it up every day or so.
Clearing: Put the jar in the fridge for about a day so it gets good and cool. Then carefully pour the mixture into a bowl through a sieve or colander lined with cheesecloth. Stir in a teaspoon of salt (trust me).
Storing: Sterilize the smaller bottles you will use for your gifts.Fill them and put the caps on. Keep them refrigerated after opening for best results. They can keep in a cool dark place for about a year.
When the "recipe" is cured....... drink it on the rocks.......or use a little in a tall glass with ice and fill with club soda... or make a Cosmo-
2 parts home-made cranberry liqueur
1 part Cointreau®
shaken not stirred
garnish with a wedge of orange, or lime
Cheers!
1 lb. Fresh Cranberries

3 cups of clear 60-80 proof liquor.
2 cups of sugar
1.5 cup water
1 navel orange - grate the peel and squeeze the juice
Large Sealing glass container
salt
Glass bottles with sealing lids
Create a simple syrup: Add 1.5 cup of water to the pot. Bring water to a slow boil. Slowly add the 2 cups of sugar. Stir constantly until the sugar is completely dissolved.
Put the berries in the blender or food processor and blend away.
Put the chopped cranberries in the pot. Simmer on low (really, really low) for about 5 minutes. Remove from heat and let stand until cool.(This takes a long time... remember it's in a sugar solution so it stays hot longer.

Select your Liquor. Most use vodka but, if you like rum (use clear), or gin better, use it. I don't use expensive vodka but I also don't use the kind you buy at the grocery store (varies by state, here in Ohio, you don't want the stuff they sell in the grocery store!) If you want to add a little kick, you can also add a couple shots of Bacardi 151 or Everclear at this point too... but I prefer it to taste like cranberry not alcohol.
Steeping: Put the cranberry/sugar mixture into a clean sterile jar. Add the liquor. Store in a cool dark place for 2 to 3 weeks. Shake it up every day or so.
Clearing: Put the jar in the fridge for about a day so it gets good and cool. Then carefully pour the mixture into a bowl through a sieve or colander lined with cheesecloth. Stir in a teaspoon of salt (trust me).
Storing: Sterilize the smaller bottles you will use for your gifts.Fill them and put the caps on. Keep them refrigerated after opening for best results. They can keep in a cool dark place for about a year.
When the "recipe" is cured....... drink it on the rocks.......or use a little in a tall glass with ice and fill with club soda... or make a Cosmo-
2 parts home-made cranberry liqueur
1 part Cointreau®
shaken not stirred
garnish with a wedge of orange, or lime
Cheers!
She Loves Wine's Caramel Puffed Corn

The inspiration for this recipe was on the back of a bag of puffed corn... I'm going to blame it on the bifocals......... I misread a recipe and came up with a better one!
This is an easy and addictive recipe... it goes fast and makes a great gift!
Preheat oven to 250 degrees
1 7-8 oz bag of Puffed Corn Curls (or you could use popcorn) I use Mike-sells Brand
1 large deep pan - or buy the throw away kind you use to roast a turkey
Empty the bag of puffed corn into the large turkey roaster... set aside

Caramel Sauce -Combine the following together in a 2 or 3 qt saucepan:
1 stick of butter (use the real thing, not margarine)
1 cup brown sugar
1/2 c. light corn syrup

1 tsp baking soda to this mixture... it will foam up high. Stir well and pour this mixture over the corn curls.

Place in 250 degree oven for 45 minutes, stirring every 10 - 15 minutes. Remove from oven and pour on wax paper and Break apart. Enjoy!


Soak this!
Tiny Pies in a Jar
As we are getting closer to Christmas more and more of us are looking for gift ideas to make.... I think these tiny Pies in a Jar are not only cute... but very, very clever......
You will want to visit Our Best Bites site to see all of them and their wonderful tutorial.

You will want to visit Our Best Bites site to see all of them and their wonderful tutorial.

Photo by Our Best Bites
Cherry Pies
Lots of suggestions on their web site... including using homemade pie crust if you're in a pinch for time or totally lack the culinary skills to make pie crust.
What a great gift for any man..........they even go in the freezer !
Thursday, December 17, 2009
Ice Cream Truffles & Link to a great site

This photo and recipe are from her site.......... peruse it and bookmark it... how wonderful to be able to have a source for the packaging to show off your great creations. All her packaging is food safe...except the metal CD boxes.
Enjoy!
The entry below is from her site..........
On a recent trip to my family's cottage in the lovely land of Muskoka, I was flipping through a Canadian Living magazine. And here is what I found. Ice cream truffles! That's right, truffles that are ice cream. I am loving everything about it!
Step 1: using a melon baller or small scoop, dish out vanilla ice cream balls and place on a tray or mini muffin tray and place in freezer
Step 2: pour some of your favorite goodies into separate bowls...nuts, coconut, sprinkles, cocoa powder
Step 3: remove the ice cream balls from the freezer and roll in the goodies
Step 4: place the truffles in a mini cupcake liner
Step 5: store in a white paper bowl with lid , in a deli plastic container , in a round hinged container or put in a freezer bag and then place inside a variety of unique boxes for a real statement
Step 6: share...bring for a hostess gift, send them home with your guests at the end of a party, or spread the love, just because!
July is national ice cream month (thanks Skip to my Lou for letting us know!). Enjoy it like you've never had before. We love creative. We love unique. We love this idea!
Sunday, November 22, 2009
Honey Almond Biscotti
Healthified Honey-Almond Biscotti
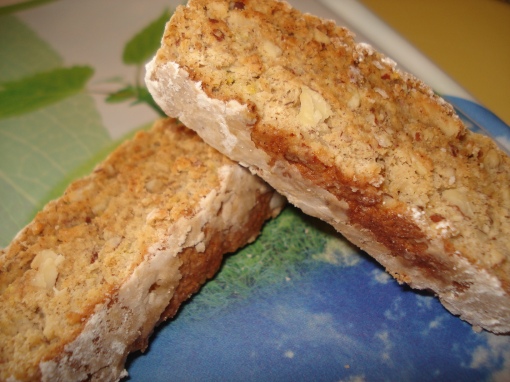
makes 2 logs of ~20 pieces of biscotti cookies
1 1/4 cups all-purpose or whole wheat flour1/3 cup granulated sugar
1/4 teaspoon baking powder
1/4 teaspoon baking soda
1/2 teaspoon ground cinnamon (I like to double to 1 tsp)
1 large egg + 1 egg white
1/2 tablespoon finely grated lemon zest
1 tablespoons honey
1/2 cup crushed almonds
powdered sugar, for rolling
Part I:
1. Preheat the oven to 350°F and line a cookie sheet with parment paper
2. In a large mixing bowl, combine the flour, sugar, baking powder, baking soda, and cinnamon.
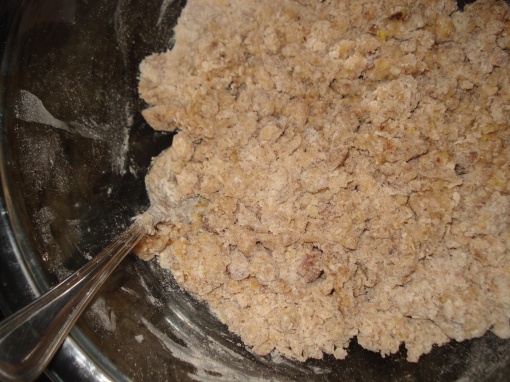
3. In a separate bowl, whisk eggs, lemon zest, and honey together. Add to flour mixture with the almonds. Stir till stiff dough forms. (as seen below. I didn’t add any more liquid to it after the picture was taken.)
4. Scrape the dough onto a lightly sugared work surface and divide it into 2 chunks. Shape and roll each piece with the palms of your hands into a log slightly shorter than the length of your cookie sheet.
5. Place logs several inches apart (the logs will double in width) on cookie sheet.
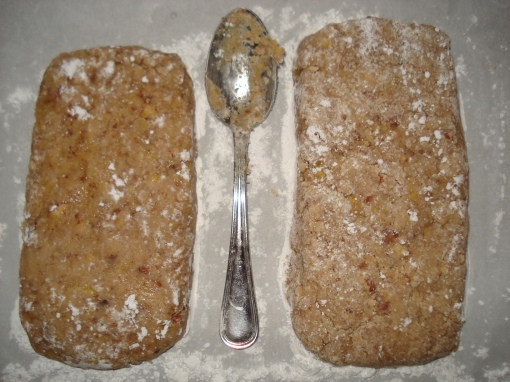
Bake for 15 minutes, until the logs feel set or firm to the touch. Set the cookie sheets on racks and let cool. Reset the oven to 300°F.
Part II:
6. When cool to the touch, place the logs on a cutting board. With a serrated knife, slice them into 1/2-inch pieces. (Check out the texture inside the biscotti!)
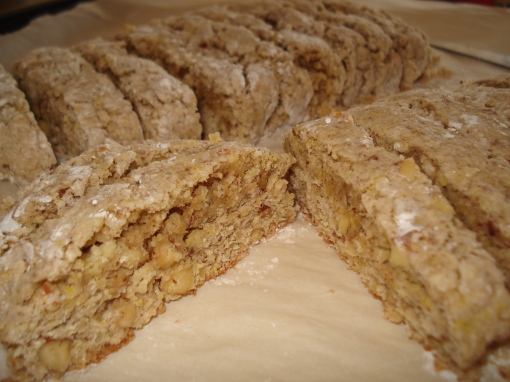
7. Lay the biscotti out on the prepared cookie sheets in a single layer and bake for an additional 10 to 15 minutes, until they are dry and lightly toasted. Cool completely. Store in an airtight tin or plastic container at room temperature for up to 2 weeks.
Flavor & Texture: The flavors are complex. Before biting, you smell the fragrant lemon zest with a light touch of cinnamon. The crust crumbles gently in your mouth while the center of the biscotti is moist and crunchy from the almonds. Each bite is filled with the sweet combination of lemon, honey, almond, and cinnamon. Absolutely addictive.
Overall Review: This recipe is so worth the effort!!!! It’s oil/grease free, full of good fiber, nut protein, and a zesty, fresh flavor!
Subscribe to:
Posts (Atom)