Showing posts with label cookies. Show all posts

Sunday, March 13, 2022

Key Lime Sugar Cookies

 Wonderful citrus flavor! 

For the Cookies:

  • 1 1/2 cup all purpose flour 195 grams
  • 1/2 teaspoon baking soda 3 grams
  • 1/2 teaspoon salt 4 grams
  • 1/2 cup unsalted butter (room temperature) 4 ounces
  • 1/4 cup granulated sugar 50 grams
  • 1/4 cup light brown sugar 50 grams
  • 1 large egg
  • 1/2 teaspoon vanilla extract
  • 1 teaspoon key lime zest (or zest of 1 key lime)
  • 2 1/2 tablespoons key lime juice
  • 1/2 cup white chocolate chips 90 grams

For the Lime Glaze:

  • 3/4 cup powdered sugar 86 grams
  • 1 - 1 1/2 tablespoons key lime juice
  • Zest from a lime to sprinkle on top

Instructions

  • Line a light colored baking sheet with a nonstick baking mat. (Dark baking sheets make the cookies brown fast on the bottom.)
  • In a small bowl, add the flour, baking soda and salt and mix together until combined.
  • In another bowl, add the butter and sugar and mix until the texture is smooth and creamy. Add in the egg, vanilla, lime juice and zest and mix until combined.
  • Slowly add in the dry ingredients into the wet ingredients and mix until well combined.
  • Add in the white chocolate chips and fold until mixed in.
  • Use a cookie scoop to place the cookie dough in tablespoon (1 to 1 1/2 tablespoons is good for these cookies) scoops on the baking sheet. You should get 20-24 cookies.
  • Refrigerate the scooped cookie dough for 30 minutes.
  • Preheat oven to 375ºF. 
  • Once the cookie dough is chilled, roll the scoops into smooth balls. Don't handle the dough too much, just roll for a few seconds to get the ball smooth. 
  • Bake for 7-8 minutes (mine were done in 7). Do not overbake! Allow the cookies to cool a few minutes and then transfer to a cooling rack to finish cooling.
  • Once cooled, mix together the powdered sugar and 1 tablespoon of lime juice to form a glaze. Add the 1/2 tablespoon of lime juice if needed to get it to a drizzling consistency (I usually use 1 1/2 tablespoons). Drizzle teaspoon amount of glaze on each cookie, sprinkle with zest and allow to set so the icing can harden. Enjoy!
  • Store in an airtight container at room temperature.Makes 24 cookiesSource: https://www.tastesoflizzyt.com/key-lime-sugar-cookies/#wprm-recipe-container-24314


Saturday, December 22, 2012

Paula Deen's Lemon Bombs


These soft cookies are the BOMB! Addicting.  This is a Paula Deen recipe I tweaked, it's fine with a yellow cake mix, but much better with a lemon cake it. Can vary this by using different puddings and juices.

Remember, I warned you.... VERY ADDICTING!


  • 18 1/2-ounce package yellow  LEMON cake mix
  • 3 1/2-ounce package instant lemon pudding mix (Sugar-free is fine)
  • 4 large eggs
  • 3/4 cup vegetable oil

Glaze:

  • 4 cups confectioners' sugar
  • 1/3 cup fresh lemon juice
  • 1 lemon, zested
  • 3 tablespoons vegetable oil
  • 3 tablespoons water

Directions

Preheat the oven to 350 degrees F.
Spray miniature muffin tins with vegetable oil cooking spray. Combine the cake mix, pudding mix, eggs and oil and blend well with an electric mixer until smooth, about 2 minutes. Pour a small amount of batter, filling each muffin tin half way. Bake for 12 minutes. Turn out into a large baking pan.
To make the glaze, sift the sugar into a mixing bowl. Add the lemon juice, zest, oil, and 3 tablespoons water. Mix with a spoon until smooth.
With a slotted spoon, dip the cupcakes into the glaze while they're still warm, covering as much of the cake as possible, or spoon the glaze over the warm cupcakes, turning them to completely coat. Place on wire racks with  cookie sheet or waxed paper underneath to catch any drips. Let the glaze set thoroughly, about 1 hour, before storing in containers with tight-fitting lids.

Sunday, December 26, 2010

Shortbread Cookies

1 1/2 cups cake flour (not self-rising)
1 1/2 cups all-purpose flour
3/4 teaspoon salt
2/3 cup sugar
2 sticks (1 cup) unsalted butter, softened

Preheat oven to 325F with rack in middle.

Whisk together both flours and salt in a bowl.

Beat together butter and sugar with an electric mixer at medium speed until pale and fluffy. At low speed, mix in flour mixture until well blended.

Divide dough in half and pat into 2 (8-inch) round ungreased cake pans. Score each round into 16 pieces. Prick all over with a fork.

Bake until golden, about 1 hour. Run a knife around edges of pan to loosen shortbread, then cut each shortbread, then cool completely in pans on racks. When cool, carefully remove with a small off set metal spatula.

Shortbread keeps in an airtight container at room temperature 1 week.


Sunday, December 12, 2010

Chocolate Peppermint Chews - Karin Calloway's

"These Chocolate Peppermint Chews use a devil’s food cake mix and a few other ingredients for home-baked holiday treats that disappear fast. The cake batter is made extra chocolaty with the addition of chocolate morsels, and is flavored with a bit of peppermint extract. The peppermint flavor is further enhanced with a drizzle of mint glaze and crushed peppermint candies."

Cookies

* 1 18.25-ounce devil’s food cake mix

* 1/2 cup vegetable oil

* 2 large eggs

* 1/2 teaspoon peppermint extract

* 1 cup mini or regular semisweet chocolate chips or mint chocolate chips


Combine first 4 ingredients, and beat at medium with an electric mixer until blended. Stir in chocolate chips. Drop dough by rounded teaspoonfuls about 2 inches apart onto ungreased baking sheets. Bake at 350 degrees for 10 minutes. Cool cookies on the pan about 5 minutes; remove to wire racks to cool completely.

To finish the cookies

* 1 cup confectioners’ sugar

* 2 drops peppermint extract

* 4 teaspoons water

* 1 cup crushed peppermint candies.

Combine the sugar, extract and water in a small bowl. Stir until smooth.

Pour into a zip-top plastic sandwich bag. Seal and cut off a small piece at one of the corners. Drizzle over the cookies and sprinkle immediately with the crushed peppermint candies.

Makes 3 dozen cookies.

Soft Molasses Cookies


Sift together:
 
3 ½ C Flour
3 tsp baking soda
1 tsp ground ginger
½ tsp cinnamon
½ tsp clove
½ tsp nutmeg
½ tsp all spice
½ tsp salt

Beat together:
1 egg
2/3 C sugar
1 C molasses
½ C melted shortening

Add 1 cup of flour mixture to the wet ingredients then mix in ¼ c cold water and ¼ c vinegar. Add the remaining flour mixture and mix well.

Chill for 1 hr. Preheat oven to 375. 

Roll out to ½ thickness and cut out cookies.

Bake 12-15 minutes and immediately take off cookie sheet and cool on wire rack. 

Makes about 4 dozen depending on how thick you roll these out.

Friday, December 10, 2010

Espresso Fudge Cups with Kahlua Glaze

This is from Cookie Madness, one of my favorite Foodie Blogs!


"
This recipe was adapted from one of my favorite cookbooks, Food Writers’ Favorite Cookies. It’s called “Espresso Fudge Cups” and it’s by Marlene Sorosky, who in the introduction says she must have made these little chocolate cups 20 times before she got them just right. She also noted that they were easy to over-bake.

I didn’t make these twenty times, but I did make them twice because the first batch seemed a little dry. It’s possible I over-baked them because I used a black pan and didn’t reduce the heat. In any case, for the second attempt I made a substitution which added some moisture — 2 tablespoons of corn syrup in place of 2 tablespoons granulated sugar. I thought they were moister with the corn syrup, but you can make them either way. Just be sure to make the glaze because it really finishes off the recipe.

All in all, these are definitely worth trying. They’re super cute and easy to make. I didn’t mind the dryness because I thought the glaze offset it and the second version, with the corn syrup, was definitely not dry."


4 oz (1 stick) unsalted butter

3 oz (1/2 cup) dark or extra dark chocolate chips

1 teaspoon instant espresso powder

1 tiny pinch salt

2 eggs

1/2 cup plus 2 tablespoons granulated sugar**

2 scant tablespoons corn syrup**

1/2 cup cake flour**


Glaze:

1 oz (2 tablespoons) unsalted butter

1/3 cup (2 oz) dark or extra dark chocolate chips

Pinch of instant espresso powder

1 teaspoon corn syrup

1 teaspoon Kahlua or brewed coffee


24 toasted Pecan Halves for garnishing


Preheat oven to 350 degrees F. Line twenty-four 1-1/2 inch miniature muffin cups with paper liners. If your cupcake pan is black, you might want to reduce the heat by 25 degrees F. I did not.


Melt butter in a medium size microwave-safe mixing bowl (should take about 1 ½ minutes). Add chocolate chips, espresso powder and salt to hot melted butter and stir well. Microwave for another 30 seconds if needed and stir until smooth. Cool for about 5 minutes. Whisk in eggs, sugar and corn syrup; stir in flour. Divide evenly among muffins cups and bake on center rack for 16-18 minutes or until the little cakes appear set. Do not over-bake because they dry out pretty easily.


Make the glaze. Melt the butter in a microwave-safe bowl or Pyrex liquid measuring cup. Stir the chocolate chips into the hot butter. Microwave another 20-30 seconds and stir until smooth. Stir in the espresso powder, corn syrup and Kahlua. If you don’t have Kahlua you can thin with a little coffee or use nothing at all. Spoon the mixture on top of each fudge cup. Garnish with a pecan half


Makes 24


**Or use 3/4 cup granulated sugar and omit the corn syrup

**Original recipe used all-purpose, but I loved how the cake flour worked and don’t think all-purpose would help with the dryness issue.

Use Your Freezer and Take Some of the Work Out of Christmas Cookies

From the wondeful folks at King Arthur Flour

Place the following in a mixing bowl, and beat until combined:


1/2 cup butter

1/2 cup vegetable shortening

3/4 cup light brown sugar, packed

1/2 cup granulated sugar

1 1/2 teaspoons baking powder

1 1/2 teaspoons cinnamon

1 1/2 teaspoons ground ginger

1/2 teaspoon ground allspice or ground cloves

3/4 teaspoon salt


Add 1 large egg, and 2 tablespoons molasses.
Beat until smooth. Amazing how that one egg smooths things out, eh?

Add 1 1/2 cups King Arthur Unbleached All-Purpose Flour. Mix until thoroughly combined, then add an additional 1 1/2 cups flour, for a total of 3 cups. Add 3 tablespoons cornstarch, along with the second batch of flour.

Mix to combine.

See how dry this looks? Scrape the bowl, and continue to mix……until everything looks well mixed, with no dry spots.

Divide the dough in half, flattening each half slightly to make a disk. Wrap in plastic, and refrigerate for 1 hour, or overnight. This chilling period will make the dough easier to handle.

Preheat the oven to 350°F.

Take one piece of dough out of the refrigerator, and place it on a piece of half-sheet parchment (16 1/2” x 12 1/4”).

If you don’t have parchment, place the dough on a lightly floured work surface.

Roll it 1/8” to 1/4” thick. A thinner cookie will be crisper; a thicker cookie, more solid/soft (though not bendy soft; just softer than crisp).

Draw a mental line down the center of the sheet; or actually cut your dough in half, using a knife or pizza cutter. Your goal is to cut cookies that will fall on one or the other half of the paper; you’ll see why in a minute.

Cut out cookies, removing and saving the dough between them. You’ll re-roll and cut these scraps.

As the dough gets warmer, it gets trickier to remove the crooked, awkward pieces of dough in between cutouts; a toothpick helps.

Now, take a pair of scissors and cut that sheet of parchment right down the middle.

If you like, you can start with a half-sheet of parchment, rather than rolling on a full sheet and then cutting; you’ll just need to use a smaller piece of dough.

As you continue to roll out dough and cut cookies, lay the sheets of cookies into a 9” x 13” pan. Continue until you’ve used all the dough.

If you prefer rolling cookies on a floured surface, you can pick them up and transfer them to the parchment in the pan. If you don’t have parchment, substitute waxed paper or foil.

Why roll directly on the parchment? It’s great for sticky dough, and/or intricate shapes. It’s easier to pick up a piece of parchment with cutout cookies than it is to successfully move delicate cookies from your rolling surface to a pan.

Next, cover the pan with plastic wrap (or a shower cap), and place it in the freezer. Once the cookies are frozen, you can leave the pan in the freezer; or, to save space (and get your pan back), remove the pan from the freezer, quickly peel the cookies off the parchment, and store them in a zip-top bag.

I say quickly because you don’t want cookies defrosting and getting soft; they’ll stick together in the bag.

Ready to bake?

Remove the cookies from the freezer. If you’ve kept them on the parchment, simply transfer cookies, parchment and all, to a baking sheet.


If the frozen cookies have been bagged, take the bag out of the freezer, and quickly place the frozen cookies on a parchment-lined baking sheet.

Do you see the word “parchment” being used constantly here? It’s the test kitchen’s best friend – and it should be yours, too. There’s nothing like parchment for keeping pans clean, moving stuff around, storage, preventing sticking, and a host of other uses.

A single piece of parchment can be used over and over again, too. What’s not to like?!
Bake the cookies just until they’re slightly brown around the edges, or until they feel firm, about 10 to 13 minutes.
Remove them from the oven...edges are just slightly brown.
When the cookies are completely cool, you can choose to decorate them – or not.
Keep the cookies on the parchment–it works to keep the layers separate when you freeze hundreds of cookies/piecrusts/etc. You can stack them as high as you need to, and then freeze the plastic tub.

If you are freezing any rolled dough, remember–get PARCHMENT. Look carefully in the foil/wrap section as many grocery stores carry it.

Freezing dough on waxed paper will turn it to wet mush that can’t be peeled off. Wastes everything including your time.

Reese’s-in-the-Middle Cookies

6.25 oz all-purpose flour (1 1/3 cup)

1.5 oz Hershey’s cocoa (1/2 cup) – I think they used natural

1/2 teaspoon baking soda

1/4 teaspoon salt

4 ounces butter, unsalted, room temperature (1 stick)

3.5 oz granulated sugar (1/2 cup)

4 oz light brown sugar, packed tightly (1/2 cup)

2.4 oz Reese’s peanut butter (1/4 cup)

1 teaspoon vanilla

1 large egg


Filling:

7 ounces Reese’ peanut butter (3/4 cup)

3 ounces confectioner’s sugar (around ¾ cup)

2 ounces Reese’s Pieces (about 1/3 cup)

Preheat oven to 375 degrees F.


To make the dough: Whisk together the flour, cocoa, baking soda and salt; set aside. Cream the butter, both sugars and peanut butter until light and fluffy . Add the vanilla and egg, beating to combine. Blend in the dry ingredients.

To make the filling: Stir the peanut butter and confectioners’ sugar until smooth. Fold in the chopped Reeses’s Pieces. With floured hands, roll into 1 inch diameter balls.

To shape the cookies, break off about 1 tablespoon of chocolate dough, make an indentation with your finger, and place a peanut butter ball inside. Push the dough up and over the ball. Repeat with remaining dough and filling.

Dip the top of each cookie into extra sugar and flatten slightly. Bake 7 to 9 minutes.

Thursday, November 4, 2010

BISCOFF COOKIES

This recipe comes from Mum in Bloom's web site - visit Sarah's web site, you'll be glad you did. I was very excited to find this recipe... I've had the Biscoff cookies on Delta Airlines, they are delish!


2 c. all-purpose flour
3 1/2 tsp. ground cinnamon (I used Saigon Cinnamon - yum!)
1/4 tsp. ground nutmeg
1/2 tsp. salt
1/2 tsp baking soda
1 c. unsalted butter, softened
1/2 c. sugar
1/4 c. firmly packed light brown sugar
1 tsp. pure vanilla extract

In a small bowl, whisk the flour, cinnamon, nutmeg,baker's ammonia and salt together; set aside.

In a large bowl, with an electric mixer on low speed, cream the butter, sugar, and brown sugar together. Add the vanilla extract.

Gradually blend the flour mixture into the butter mixture.

The dough is thick but not too stickey.
Spread it in the pan with your fingers.

Press the dough evenly into the bottom of a 9x13 greased pan. Decoratively score the dough with a fork or small knife, if you wish.

I used a cake server to make a decorative pattern.

Bake in a 350-degree oven for about 20 to 25 minutes (mine was 25 min), or until golden brown around the edges. Let cool completely before cutting into bars. Store in an airtight container. Well-wrapped shortbread may also be frozen.

Sunday, February 21, 2010

Chocolate Pot Oatmeal Cookies

 What wouldn't be delish dipped in this smooth chocolate sauce?

And just in time for St Paddy's day......  perhaps a little Irish coffee to go with this?!  My grandmother came from County Clare, Ireland but she never made us the chocolate pots....


This extraordinarily rich, smooth chocolate dessert is complemented by crunchy Irish oatmeal cookies.
Chocolate Pots:
5  oz. semi-sweet chocolate
1  c. heavy cream
1  lg. egg
1  tbsp. vanilla
Break up the chocolate and place in food processor. Heat cream to almost boiling. Add to the chocolate. Blend until chocolate has melted and the mixture is smooth. Add the egg and vanilla and blend again until smooth. Pour into individual dishes and chill for at least 24 hours. Serve with crunchy oatmeal cookies.
Crunchy Irish Oatmeal Cookies:
8       oz. Kerrygold Irish Butter
1-1/2 c. fine granulated sugar
1       egg
1       tsp. vanilla extract
1-3/4 c. all-purpose flour
1       tsp. baking soda
1       tsp. baking powder
1-1/4 c. McCann's Quick Cooking Irish Oatmeal
Oven 350F
Using electric mixer, cream the butter and sugar. Add the egg and vanilla and beat until fluffy. Stir in the flour, baking soda, baking powder and oatmeal. Line a baking sheet with non-stick paper. Drop teaspoons full onto the sheet, leaving space between. Bake for 12 minutes until golden, but not brown. Remove from baking sheet and cool. Yield: 4 dozen
Dip each cookie into the chocolate pot for a delicious combination of flavors.

Saturday, February 20, 2010

Chocolate-Lovers Oatmeal Delights

  These gems substitute chocolate and peanut butter flavored chips instead instead of raisins.

48 cookies
In a medium mixing bowl, combine flour, cocoa powder, baking soda and salt.
Set aside.
In a very large mixing bowl, beat butter with an electric mixer on medium speed for 30 seconds.
Add the sugar and beat mixture till combined, scraping sides of bowl occasionally.
Beat in egg, water and vanilla till combined.
Beat in as much of the flour mixture as you can.
Using a wooden spoon, stir in any remaining flour mixture and the rolled oats.
Stir in chocolate pieces and peanut butter pieces.
Drop dough by rounded tablespoon 2 inches apart on an ungreased cookie sheet.
Bake in a 350 oven for 10 to 12 minutes or till the edges are set.
Transfer cookies to a wire rack and cool.

Friday, December 18, 2009

Another great foodie blog and GREAT idea for kids

You need to check out her web site - too cute! I love the snowman marshmallows... wondering if the edible markers can be purchased at a national chain store - for those of us who tend to be late bakers and shoppers. Everything you see below for this posting came right from her web site....it's so cute... lots of great ideas... I can't wait for you to see it! 

http://chiccookiekits.blogspot.com/2009/12/sweet-snowy-gifts-gingerbread-snowflake.html

Wednesday, December 16, 2009


sweet snowy gifts (gingerbread snowflake ornaments and snowman cocoa jars)

I made a batch of gingerbread snowflake ornaments for cookie gifts this year, and since no one can escape my newfound love of painting marshmallows, I ended up adding a mason jar o' warmth to go with them.

I used a gingerbread cookie recipe from Williams-Sonoma (link provided below), then filled a mason jar with snowman marshmallows and hot cocoa. I added a recipe tag, slapped on a sticker and all done.


how to make gingerbread snowflake ornaments

you will need
gingerbread recipe
frosting
snowflake cutter (mine was
about 2 1/2 inches)
straw
one frosting bag, coupler and size "3" tip

white frosting color

white sanding sugar or sprinkles

thin ribbon
cellophane favor bags


what to do
Prepare gingerbread recipe. Roll about 1/4-inch thick and place on parchment paper lined baking tray. Make holes with the straw and bake as directed by the recipe. Let cool. Tint frosting white and prepare a frosting bag with size 3 tip. Fill with white frosting and tie closed with a rubber band. Working with one cookie at a time, pipe snowflake designs and immediately sprinkle with sanding sugar or sprinkles. Let dry overnight.

To package, string ribbon through several cookies and tie. Place the cookies in a cellophane bag and tie closed with another piece of ribbon.


how to make snowman hot cocoa mason jars

you will need
mason jars
marshmallows
black and orange edible pens
(I suggest Americolor gourmet writers)
hot cocoa mix
cellophane favor bags

tags, stickers and ribbon (optional)


what to do
use markers to make snowman faces on marshmallows. Let dry about an hour. Fill a favor bag with some hot cocoa mix (I used about a cup) and twist closed with a tie. (I used the favor bag instead of putting right in the jar to keep things tidy, but you can also just add the mix right to the jar.) Place the favor bag of cocoa in the jar with the tied area in the middle at the top. Place marshmallows around the top of the cocoa facing out of the jar. Close with lid.

If desired, add your own personalized sticker to the top of the jar, or attach a tag with the cocoa recipe using a piece of card stock, a hole punch and a piece of ribbon.

Saturday, December 12, 2009

Magic Peanut Butter Middles


Servings: 15

"Chocolate cookie with a surprise peanut butter center."
:

1 1/2 cups all-purpose flour

1/2 cup unsweetened cocoa powder

1/2 teaspoon baking soda

1/2 cup white sugar

1/2 cup packed brown sugar

1/2 cup butter, softened


1/4 cup peanut butter

1 teaspoon vanilla extract

1 egg

3/4 cup confectioners' sugar

3/4 cup peanut butter

Directions:

1. In small bowl blend flour, cocoa and baking soda. Mix until well blended.

2. In large bowl beat sugar, butter or margarine and 1/4 cup peanut butter, until light and fluffy. Add vanilla and egg, beat. Stir in flour mixture until blended. Set aside.

3. To make Filling: Combine confectioner's sugar and 3/4 cup peanut butter. Blend well.

4. Roll filling into 30 - 1 inch balls. For each cookie, with floured hands, shape about 1 Tablespoon of dough around 1 peanut butter ball, covering completely. Place 2 inches apart on an ungreased cookie sheet. Flatten with glass dipped in sugar.

5. Bake at 375 degrees F (190 degrees C) for 7-9 minutes. When cookies are done, they should be set and slightly cracked.

Sunday, November 22, 2009

Recipe Girl's Pumpkin Snickerdoodles

Mmmmmm........so good.  I love her web site - you will too - please check her site out.

Pumpkin Snickerdoodles

Pumpkin Snickerdoodles


COOKIES:
2 sticks butter (1 cup), at room temperature
1 1/2 cups granulated sugar
3/4 cup pure pumpkin puree
1 large egg
2 tsp pure vanilla extract
3 3/4 cups all-purpose flour
1 1/2 tsp baking powder
1/2 tsp salt
1/2 tsp ground cinnamon

ROLLING SUGAR:
1/2 cup granulated sugar
1 tsp ground cinnamon
1/2 tsp ground ginger
1/2 tsp allspice
1. In a large bowl, cream butter with an electric mixer until fluffy. Add sugar and pumpkin puree and beat well. Mix in egg and vanilla, scraping down sides of the bowl to incorporate all of the ingredients.
2. In a medium bowl, whisk together flour, baking powder, salt and ground cinnamon. Beat flour mixture into liquid mixture a little at a time until incorporated.
3. Cover dough with plastic and chill at least an hour, or until dough becomes slightly firm.
4. When ready to bake, preheat oven to 350°F. Line baking sheets with parchment paper (or spray with nonstick spray). Mix rolling sugar in a small bowl.
5. Remove cookie dough from refrigerator. Use a medium cookie scoop (1 1/2 Tbsp.) or a large spoon to scoop out dough and roll into balls. Use your hands to roll the balls in the cinnamon sugar and make sure they’re coated really well. Place 2 inches apart on the prepared baking sheets.  Use a glass with a nice, flat bottom to dip in sugar and flatten the balls.
6. Bake at 350°F. for 10 to 14 minutes, or until they are slightly firm to the touch. Let cool on baking sheets for 5 minutes or so, then remove them to a wire rack to cool completely.
Yield: About 3 dozen
Cooking Tips
*Store in an airtight container. These cookies freeze well too. Place them in freezer zip bag and remove from freezer when the craving hits.
Source: Adapted from dlynz.com
PRINT THIS RECIPE using your browser’s ‘print’ function. It’s automatically formatted to print recipe & picture only.
RATE THIS RECIPE1 Star2 Stars3 Stars4 Stars5 Stars (2 votes, average: 2.50 out of 5)

Read more: http://www.recipegirl.com/2007/11/05/pumpkin-snickerdoodles/#ixzz0Xb3VP4Bz

Tuesday, October 27, 2009

The World's BEST Chocolate Chip Cookies


Thick and Chewy Chocolate Chip Cookies
adapted from America's Test Kitchen
2 cups plus 2 Tbsp all-purpose flour
1/2 tsp baking soda
1/2 tsp salt
12 Tbsp (1 1/2 sticks) unsalted butter, melted & cooled until warm
1 c brown sugar, packed
1/2 c granulated sugar
1 large egg plus 1 yolk
2 tsp vanilla extract
1 1/2 cups semisweet chocolate chips

Directions:
-Adjust oven racks to upper & lower -middle positions & heat oven to 325. Line cookie sheets with parchment paper.
-Whisk dry ingredients together; set aside.
-With electric mixer, or by hand, mix butter & sugars until thoroughly combined.
-Beat in egg, yolk and vanilla until combined.
-Add dry ingredients & beat at low speed just until combined. Stir in chips.
-Roll scant 1/2 cup dough into ball. Holding dough ball in fingertips of both hands, pull into 2 equal halves. Rotate halves 90 degrees and, with jagged surfaces facing up, place formed dough onto cookie sheet, leaving ample room between each ball.
-Bake, reversing position of cookie sheets halfway through baking, until cookies are light golden brown and outer edges start to harden yet centers are still soft & puffy (about 17 minutes in my oven).
-Cool cookies on sheets until able to lift without breaking and place on wire rack to cool.

Makes about 24 give or take how much batter you eat before they get in the oven! ;)

Thursday, October 8, 2009

Icing for Cookies 2

o 1/2 cup butter, melted
o 2 cups confectioners' sugar
o 1 teaspoon vanilla extract
o 4 teaspoons hot water


1. Mix butter, powdered sugar and vanilla together. Add teaspoons of hot water until you reach your desired consistency for spreadable icing.

2. Spread icing over the cooled Sour Cream Cookies.

Sugar Cookie Icing 1

o 1 cup confectioners' sugar
o 2 teaspoons milk
o 2 teaspoons light corn syrup
o 1/4 teaspoon almond extract
o assorted food coloring

1. In a small bowl, stir together confectioners' sugar and milk until smooth. Beat in corn syrup and almond extract until icing is smooth and glossy. If icing is too thick, add more corn syrup.

2. Divide into separate bowls, and add food colorings to each to desired intensity. Dip cookies, or paint them with a brush.

Sunday, February 1, 2009

Lemon Ricotta Cookies with Lemon Glaze


Recipe courtesy Giada De Laurentiis

Serves:44 cookies

* 2 1/2 cups all-purpose flour
* 1 teaspoon baking powder
* 1 teaspoon salt
* 1 stick unsalted butter, softened
* 2 cups sugar
* 2 eggs
* 1 (15-ounce) container whole milk ricotta cheese
* 3 tablespoons lemon juice
* 1 lemon, zested

Glaze:

* 1 1/2 cups powdered sugar
* 3 tablespoons lemon juice
* 1 lemon, zested

Directions

Preheat the oven to 375 degrees F.
Cookies:

In a medium bowl combine the flour, baking powder, and salt. Set aside.

In the large bowl combine the butter and the sugar. Using an electric mixer beat the butter and sugar until light and fluffy, about 3 minutes. Add the eggs, 1 at a time, beating until incorporated. Add the ricotta cheese, lemon juice, and lemon zest. Beat to combine. Stir in the dry ingredients.

Line 2 baking sheets with parchment paper. Spoon the dough (about 2 tablespoons for each cookie) onto the baking sheets. Bake for 15 minutes, until slightly golden at the edges. Remove from the oven and let the cookies rest on the baking sheet for 20 minutes.
Glaze:

Combine the powdered sugar, lemon juice, and lemon zest in a small bowl and stir until smooth. Spoon about 1/2-teaspoon onto each cookie and use the back of the spoon to gently spread. Let the glaze harden for about 2 hours. Pack the cookies into a decorative container.

Tuesday, January 20, 2009

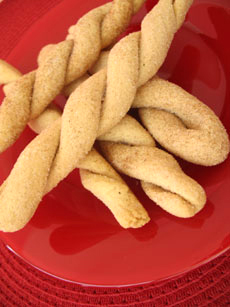
Cinnamon Twists

This recipe comes from The Nibble - check them out!


Cinnamon Twists

Holiday dinners tend to be plentiful and rich, so that when dessert time comes, no one needs anything heavy. Yet, everyone wants to end the evening with something a bit sweet. These cinnamon twists are crunchy and airy—perfect for a light dessert. They can be served with ice cream or fruit salad, and are delicious plain with coffee or tea, for people who want a really light dessert. They’re actually a universal pastry—they can be served at brunch, lunch, dinner or as a snack. They’re both elegant-tasting and casual. We promise they’ll become a favorite.

Ingredients

* 3¾ cups all-purpose flour
* 2 teaspoons baking powder
* 1 stick (8 tablespoons) unsalted butter,
softened
* 1½ cups sugar
* 3 extra large eggs
* 2 teaspoons pure vanilla extract
* 1½ teaspoons group cinnamon

Cinnamon Twists

Directions

1. Preheat the oven to 350°F. Line two baking sheets with parchment paper.
2. In a large bowl, whisk together the flour and baking powder until combined.
3. In the bowl of an electric mixer fitted with the paddle attachment, cream the butter with 1 cup of sugar until light and fluffy. Add the eggs, one at a time, beating well after each addition. Stir in the vanilla. With the mixer on low speed, add the dry ingredients and beat until a dough forms.
4. In a bowl, stir together the remaining ½ cup sugar and cinnamon, then spread the cinnamon sugar evenly over a baking sheet or flat surface.
5. To shape the twists, measure the dough into tablespoons. Shape each tablespoon into a compact cylinder, about 2" long, then roll it with your hands on a counter top until it measure 12".
6. Fold the roll in half, then twist the roll about 3 times to form a spiral. Roll the spiral gently in the cinnamon sugar, coating it completely as you maintain the spiral “rope-y” shape. (When you roll the spiral in the sugar mixture, it will lengthen by about 1".)
7. Transfer each finished twist to the prepared baking sheet, leaving about ½" in-between. Continue to make twists and sugar them in the same manner.
8. Bake the twists, one sheet at a time, for 15 minutes, until lightly golden. Let cool on the baking sheet, then transfer to a wire rack to cool completely.
9. Store the twists in a large container, in layers separated by wax paper, for up to 1 week.

Makes about 44 cookies, each 7 inches long.